Historical walkthrough
Elastic Transcoder shut down on 13 November 2025. The Node.js 10 runtime, Serverless 1 configuration and AWS SDK v2 examples below also need migration before use today. Prices, limits and billing increments refer to the original tests.
For a side project I’m converting WebM audio files to MP3. I initially started doing this with Amazon Elastic Transcoder. But after doing the same with FFmpeg and Lambda Layers, my testing showed that the latter was substantially cheaper and ~2 times faster for short audio recordings (for ~3 minute, ~3 MB files).
Just want to read the code?
Use case
My side project is a web app that allows users to record their voice so others can listen to it. In the app I use the MediaStream Recording API (aka Media Recording API) to easily record audio from the user’s input device. It works really well, and you don’t have to use any external libraries!
There’s one catch though. At the time of this writing it only works in Firefox, Chrome and Opera. It “sort of” works in Safari1. Even though that’s a bit disappointing, I’m okay with that for my use case.
Note
Safari has since enabled MediaRecorder by default.
So after I had built something functional that allowed me to record my voice, it turned out that the audio file I ended up with had to be transcoded if I wanted to listen to it across a wide range of browsers and devices.
What does transcoding even mean?
Before I can answer that, we need to explore what an audio file is.
We can think of an audio file like a stream of data elements wrapped in a container. This container is formally called a media container format. It’s basically a file format (think file type) that can store different types of data elements (i.e. bits).
The container describes how this data “coexists” in a file. Some container formats only support audio, like WAVE (usually referred to as WAV). Others support both audio and video, like WebM.
So a container “wraps” data to store it in a file, but information can be stored in different ways. We’ll also want to compress the data to optimize for storage and/or bandwidth by encoding it (i.e. converting it from one “form” to another).
This is where a codec (coder/decoder) comes into play. It handles all the processing that’s required to encode (compress) and decode (decompress) the audio data.
So when describing an audio or video file, we usually need to specify both its container and its codec2.
For example, AAC audio in an MP4 container is commonly stored as an .m4a file.
An MP3 file contains MPEG-1 or MPEG-2 Audio Layer III frames:
it does not need an MP4 container.
So what does transcoding mean? It’s the process of converting one encoding into another. If we convert one container format into another, this process is called transmuxing.
There are a lot of codecs available. Each codec will have a different effect on the quality, size and/or compatibility of the audio file3.
Why do you need to transcode audio?
You might be wondering (like I was), if we can record audio directly in the browser and immediately use the result in our app, why do we even have to transcode it?
The answer is: to optimize for compatibility. Because the Media Recording API can not record audio in all media formats.
For example, MP3 has good compatibility across browsers and devices for playback, but is not supported by the Media Recording API. What formats are supported depend on the browser’s specific implementation of said API.
We can use the isTypeSupported method to figure out if we can record in a specific media type by calling it with a MIME type. Run the following code in the web console (e.g. in Firefox) to see it in action:
MediaRecorder.isTypeSupported("audio/mpeg") // falseOkay, MP3 isn’t supported. Which format can we use to record in then? It looks like WebM is a good choice:
MediaRecorder.isTypeSupported("audio/webm") // trueAlso note that you can specify the codec in addition to the container:
MediaRecorder.isTypeSupported("audio/webm;codecs=opus") // trueSo if we want to end up with MP3 files of the recordings, we need to transcode (and technically also transmux) the WebM audio recordings.
How will we do this?
We’ll explore two implementations that both convert a WebM audio file to MP3:
For both implementations we’ll use the Serverless Framework and Node.js to write the code for the Lambda function that converts an audio file.
Before we get started, make sure you have Node.js installed. Then use npm to install the Serverless Framework globally:
npm i -g serverlessAdditionally, we’ll need two S3 buckets to process and store the converted audio files:
- An input bucket to upload WebM audio files.
- An output bucket to store transcoded MP3 files.
Using Amazon Elastic Transcoder
Amazon Elastic Transcoder is a fully managed and highly scalable AWS service that can be used to transcode audio and video files.
We can use this service to schedule a transcoding job in a pipeline. The pipeline knows from which bucket to read a file that needs to be converted, and to which bucket the converted file should be written. The job contains instructions on which file to transcode, and to what format it should be converted.
We’ll create a Lambda function that will “listen” to the S3 input bucket. Whenever a new object is created in that bucket, Lambda will schedule a transcoder job to create the MP3 file.
So the flow will be like this:
- A WebM audio file is uploaded to the input bucket.
- The Lambda function is triggered, and uses the key of the created S3 object to schedule a transcoder job.
- A job is scheduled in the pipeline, where Amazon Elastic Transcoder:
- Fetches the WebM audio file from the input bucket.
- Transcodes the WebM audio file to MP3.
- Uploads the MP3 file to the output bucket.
Warning
At the time of this writing AWS CloudFormation has no support for Amazon Elastic Transcoder. So you’ll have to use the AWS web console to create and configure your pipeline(s).
We’ll go through the following steps to get it up and running:
- 1. Create a pipeline
- 2. Choose a preset
- 3. Create an IAM Policy
- 4. Create a Serverless project
- 5. Implement the Lambda function
- 6. Release the Lambda function
- 7. Schedule a job
1. Create a pipeline
Navigate to the Elastic Transcoder service in the AWS web console.
Select a region (we’ll use eu-west-1) and click on “Create New Pipeline”.
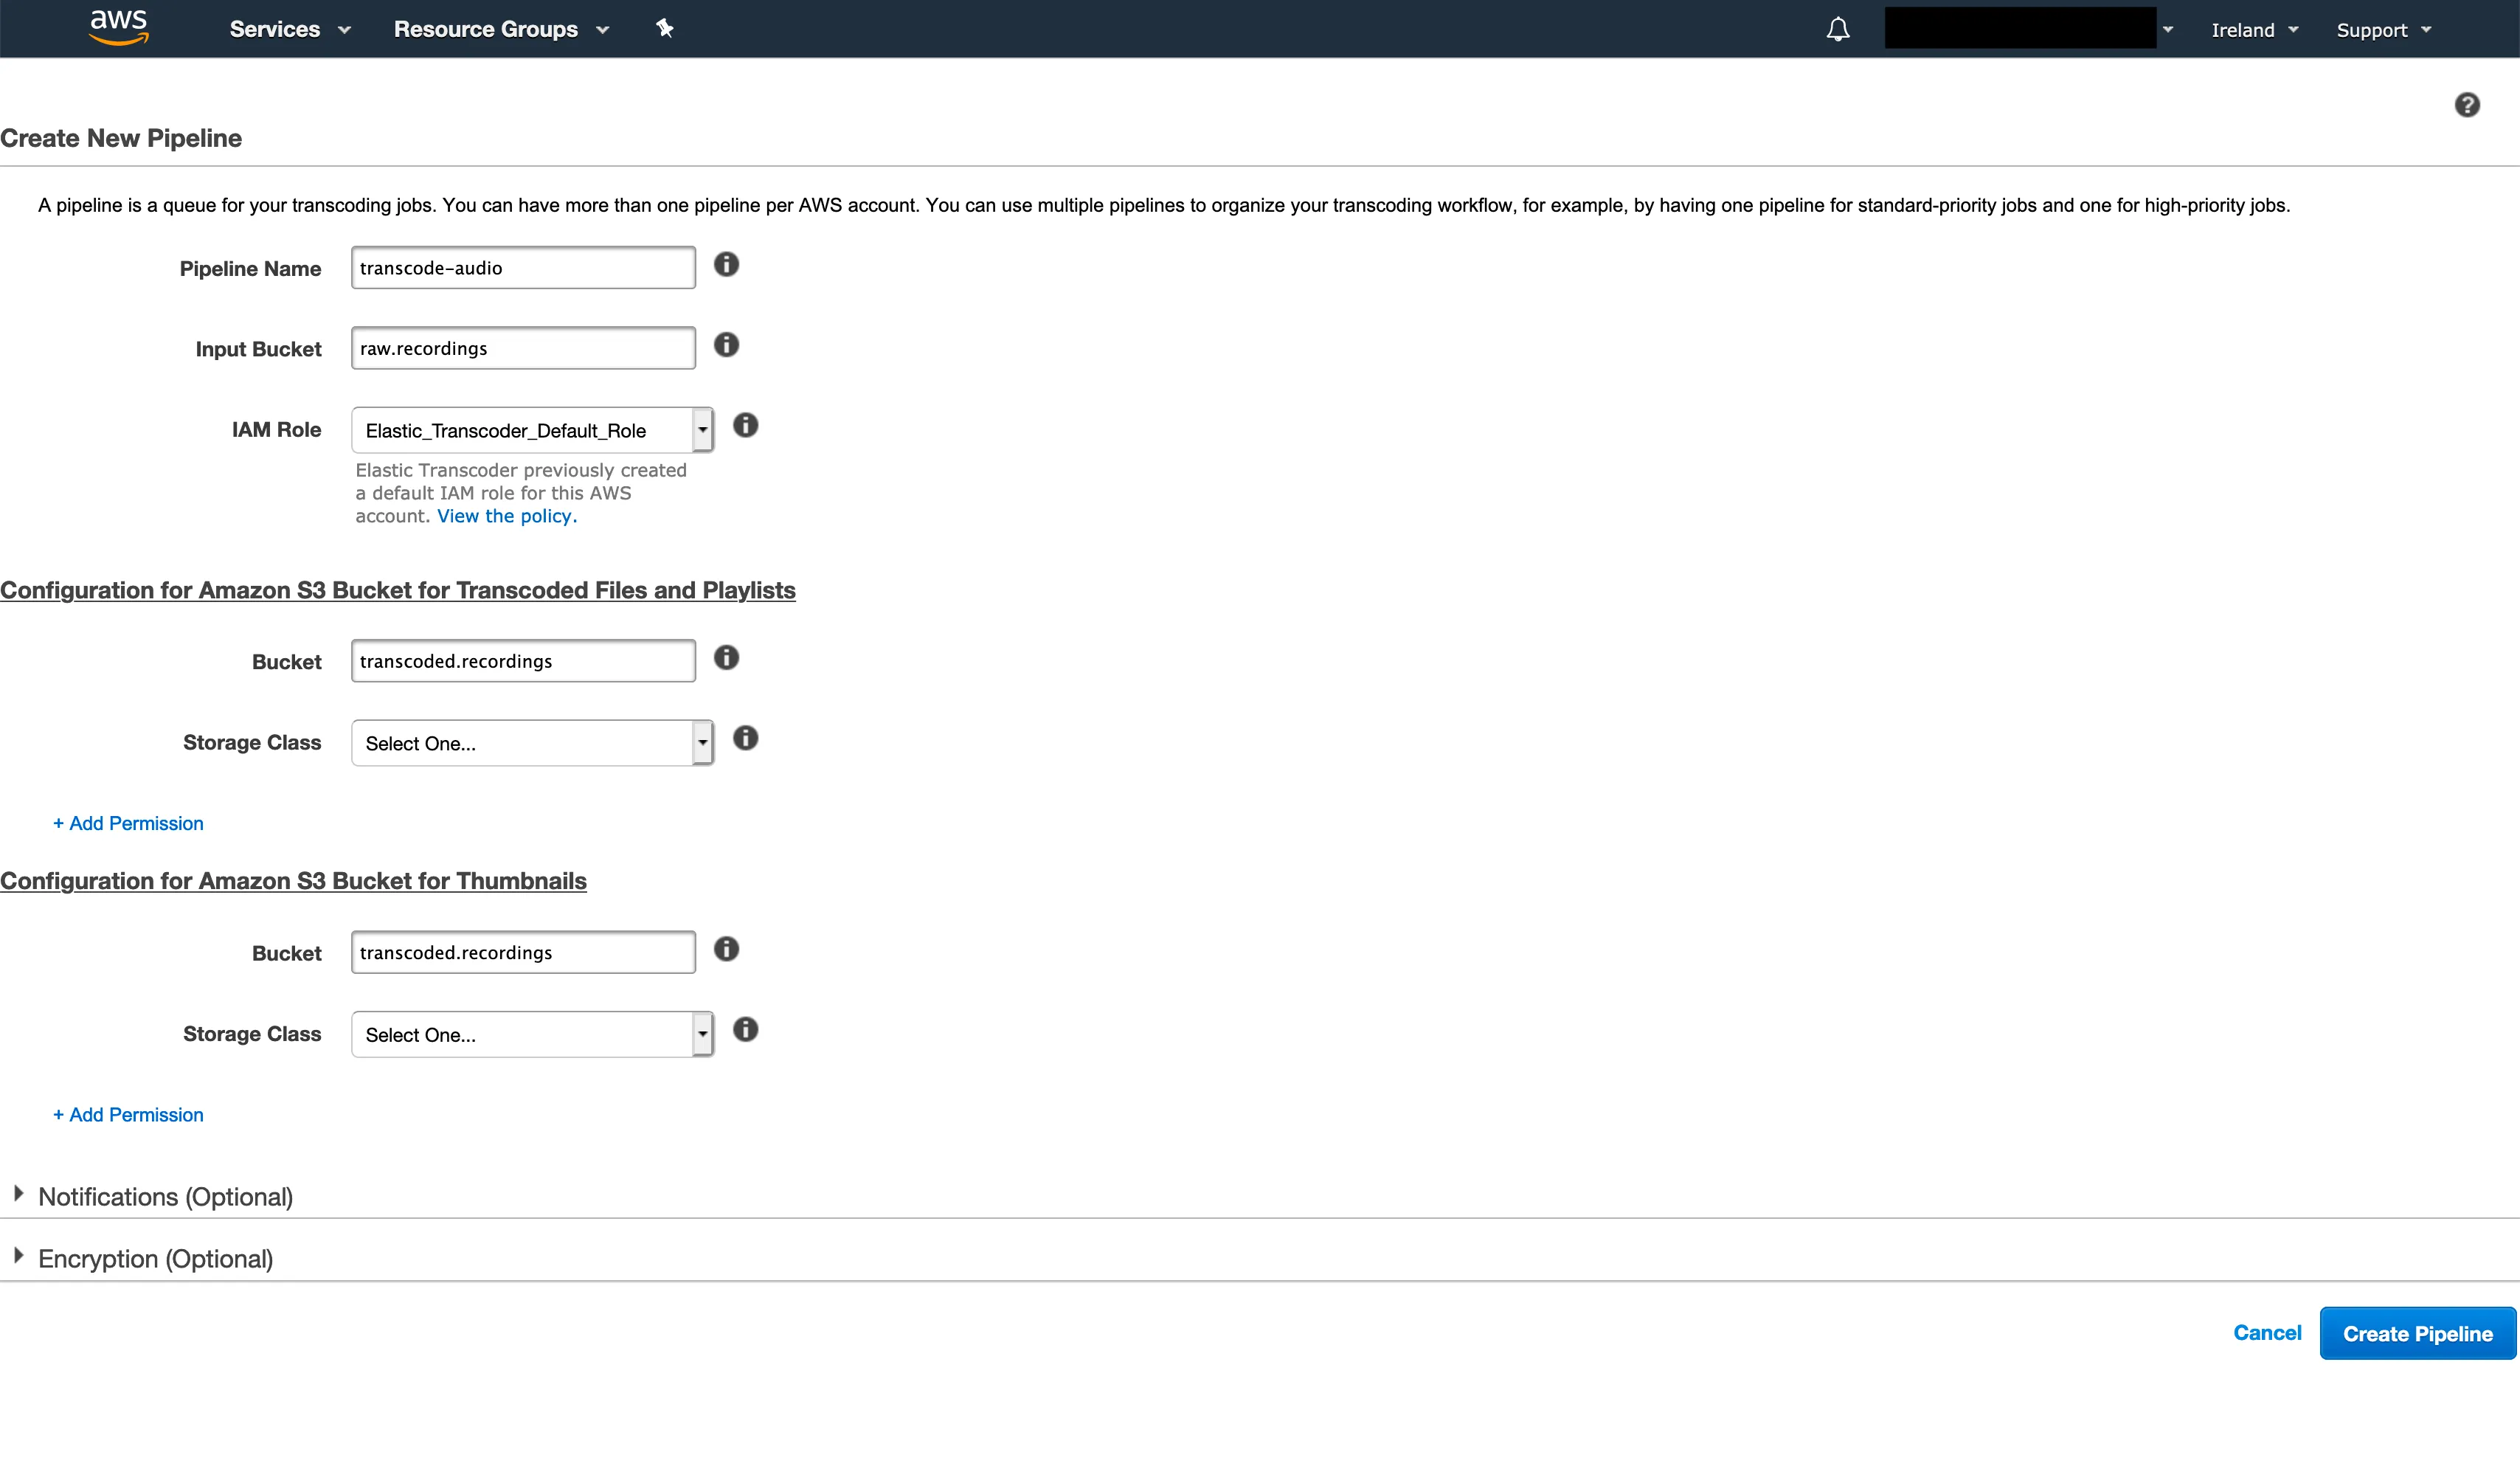
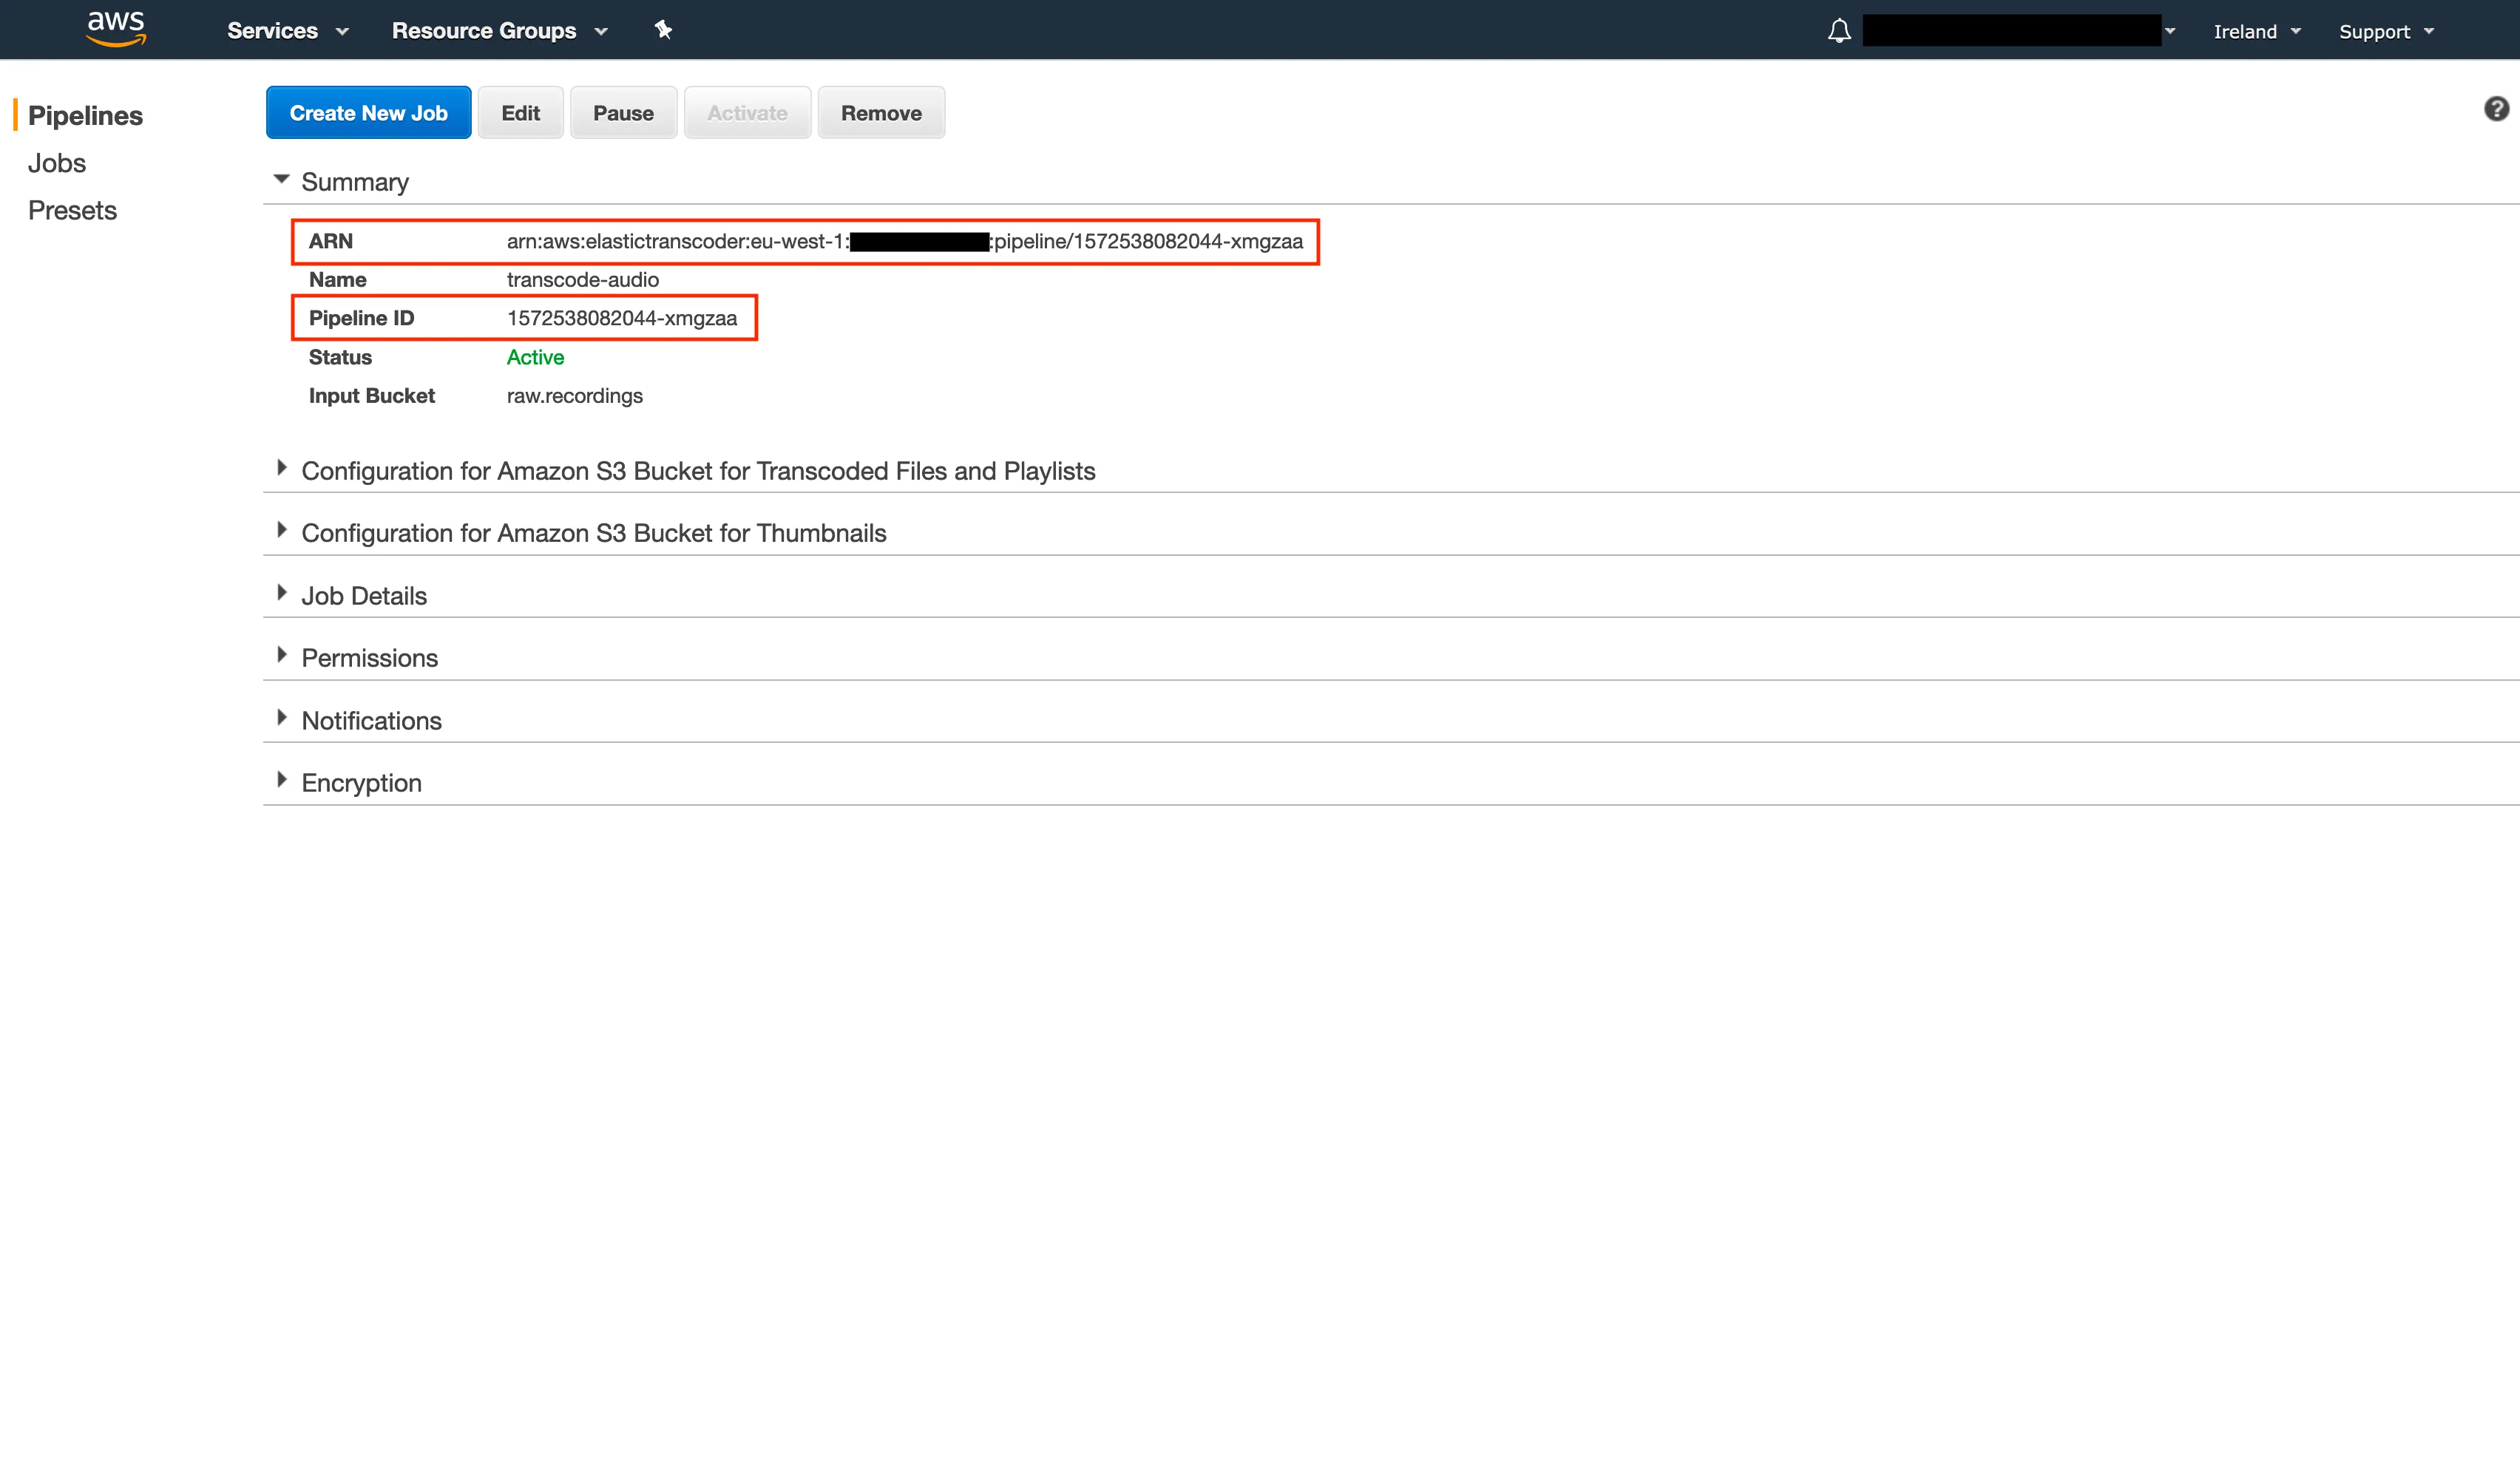
Create the pipeline and take note of the ARN and Pipeline ID. We’ll need both to configure the Lambda function later on.
2. Choose a preset
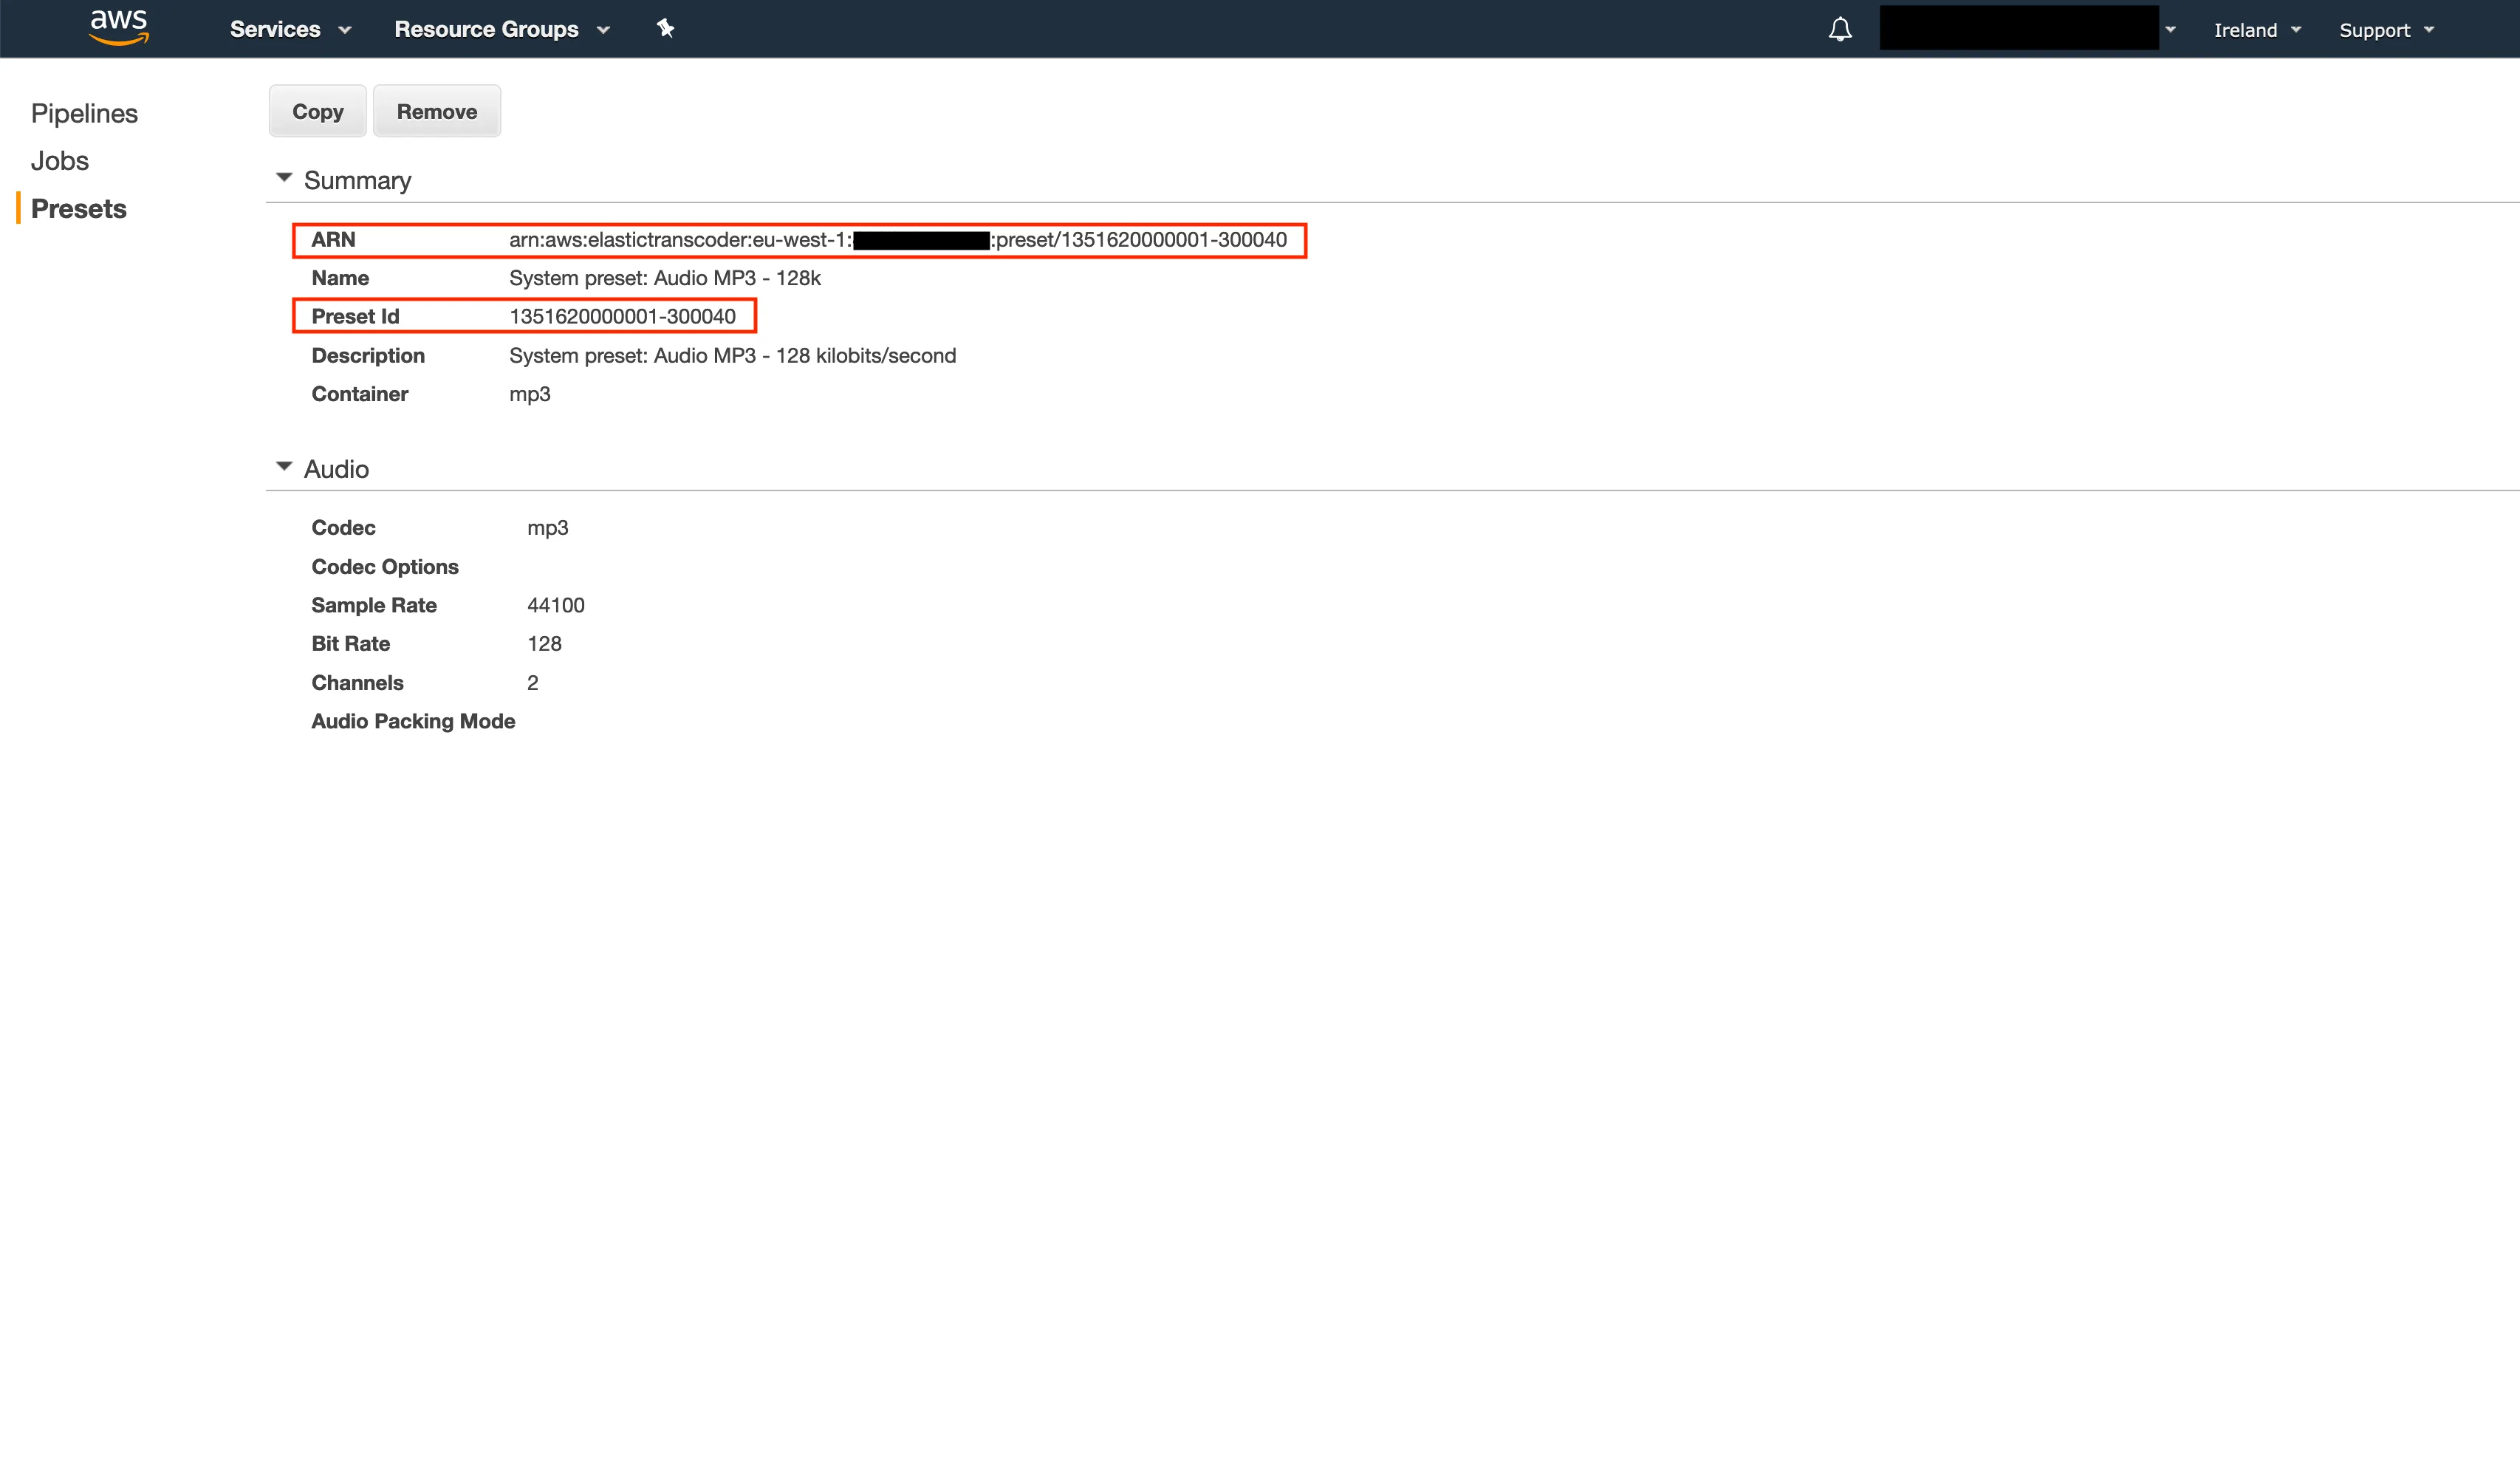
The pipeline we created in the previous step requires a preset to work. Presets contain settings we want to be applied during the transcoding process. Lucky for us, AWS already has system presets to convert to MP3 files.
In the web console, click on “Presets” and filter on the keyword “MP3”. Select one and take note of its ARN and Preset ID. We’ll also need these to configure the Lambda function.
3. Create an IAM Policy
AWS will already have created an IAM Role named Elastic_Transcoder_Default_Role.
But in order for the pipeline to read objects from the input bucket and write objects to the output bucket,
we need to make sure the role has the required permissions to do so.
Create a new IAM Policy with the following configuration:
{ "Version": "2012-10-17", "Statement": [ { "Effect": "Allow", "Action": "s3:GetObject", "Resource": "arn:aws:s3:::raw.recordings/*" }, { "Effect": "Allow", "Action": "s3:PutObject", "Resource": "arn:aws:s3:::transcoded.recordings/*" }, { "Effect": "Allow", "Action": "s3:ListBucket", "Resource": "arn:aws:s3:::transcoded.recordings" } ]}Make sure the resource ARNs of your input and output buckets are named correctly.
After the Policy has been created, attach it to Elastic_Transcoder_Default_Role.
4. Create a Serverless project
Create a new project named “audio-transcoder”. Move into this directory and create a Serverless manifest in the project root:
service: audio-transcoder
provider: name: aws runtime: nodejs10.x
package: exclude: - ./* - ./**/*.test.js include: - node_modules - srcAdd the Elastic Transcoder Pipeline ID, MP3 Preset ID and region (from step 1 and step 2) as environment variables:
service: audio-transcoder
provider: name: aws runtime: nodejs10.x environment: TRANSCODE_AUDIO_PIPELINE_ID: "1572538082044-xmgzaa" TRANSCODER_MP3_PRESET_ID: "1351620000001-300040" ELASTIC_TRANSCODER_REGION: "eu-west-1"
package: exclude: - ./* - ./**/*.test.js include: - node_modules - srcUse the Elastic Transcoder Pipeline ARN and MP3 Preset ARN (from step 1 and step 2) to configure the Lambda with the required IAM permissions, so it can create transcoder jobs:
service: audio-transcoder
provider: name: aws runtime: nodejs10.x environment: TRANSCODE_AUDIO_PIPELINE_ID: "1572538082044-xmgzaa" TRANSCODER_MP3_PRESET_ID: "1351620000001-300040" ELASTIC_TRANSCODER_REGION: "eu-west-1" iamRoleStatements: - Effect: Allow Action: - elastictranscoder:CreateJob Resource: - YOUR_PIPELINE_ARN # Replace this with the ARN from step 1 - YOUR_PRESET_ARN # Replace this with the ARN from step 2
package: exclude: - ./* - ./**/*.test.js include: - node_modules - srcFinally, add the Lambda function definition. This Lambda will be executed whenever an object is created in the input bucket:
service: audio-transcoder
provider: name: aws runtime: nodejs10.x environment: TRANSCODE_AUDIO_PIPELINE_ID: "1572538082044-xmgzaa" TRANSCODER_MP3_PRESET_ID: "1351620000001-300040" ELASTIC_TRANSCODER_REGION: "eu-west-1" iamRoleStatements: - Effect: Allow Action: - elastictranscoder:CreateJob Resource: - YOUR_PIPELINE_ARN # Replace this with the ARN from step 1 - YOUR_PRESET_ARN # Replace this with the ARN from step 2
package: exclude: - ./* - ./**/*.test.js include: - node_modules - src
functions: transcodeToMp3: handler: src/handler.transcodeToMp3 description: Transcode an audio file to MP3 events: - s3: bucket: "raw.recordings" event: "s3:ObjectCreated:*" existing: true5. Implement the Lambda function
In order to match the Lambda function definition in the Serverless manifest,
create a file named handler.js in src, and export a method named transcodeToMp3:
"use strict"
module.exports.transcodeToMp3 = async () => { try { // Implementation goes here. } catch (err) { console.log("Transcoder Error: ", err) throw err }}In the previous step we configured the Lambda to be executed whenever an object is created in the input bucket.
This means that AWS will call the Lambda with an event message that contains a list of Records.
Each Record will contain an s3 object with information about the s3:ObjectCreated event:
// "event" object:{ "Records":[ // "Record" object: { "s3":{ // Contains information about the "s3:ObjectCreated" event. } } ]}The s3 object will contain a property called key, which is the “name” of the file that was created in the input bucket.
For example, if we upload a file named test.webm to the S3 bucket, the value of key will be the (URL encoded!) string test.webm.
You can see the entire event message structure in the AWS S3 docs.
Also be aware that you can get more than one Record.
So always process all of them:
"use strict"
module.exports.transcodeToMp3 = async (event) => { try { for (const Record of event.Records) { const { s3 } = Record if (!s3) { continue }
const { object: s3Object = {} } = s3 const { key } = s3Object if (!key) { continue }
const decodedKey = decodeURIComponent(key.replace(/\+/g, " ")) // TODO: use "decodedKey" to schedule transcoder job. } } catch (err) { console.log("Transcoder Error: ", err) throw err }}Finally, initialize the transcoder client and schedule a transcoder job for every created object in the input bucket:
"use strict"
const ElasticTranscoder = require("aws-sdk/clients/elastictranscoder")
const { ELASTIC_TRANSCODER_REGION, TRANSCODE_AUDIO_PIPELINE_ID, TRANSCODER_MP3_PRESET_ID } = process.env
const transcoderClient = new ElasticTranscoder({ region: ELASTIC_TRANSCODER_REGION,})
module.exports.transcodeToMp3 = async (event) => { try { for (const Record of event.Records) { const { s3 } = Record if (!s3) { continue }
const { object: s3Object = {} } = s3 const { key } = s3Object if (!key) { continue }
const decodedKey = decodeURIComponent(key.replace(/\+/g, " ")) await transcoderClient .createJob({ PipelineId: TRANSCODE_AUDIO_PIPELINE_ID, Input: { Key: decodedKey, }, Outputs: [ { Key: decodedKey.replace(/\.webm$/i, ".mp3"), PresetId: TRANSCODER_MP3_PRESET_ID, }, ], }) .promise() } } catch (err) { console.log("Transcoder Error: ", err) throw err }}You can read more about the createJob API in the AWS JavaScript SDK docs.
6. Release the Lambda function
In order to upload the Lambda to AWS, make sure you have your credentials configured. Then run the following command from the project root to release the Lambda:
sls deploy --region eu-west-1 --stage prod7. Schedule a job
With everything up and running, we can now upload a WebM audio file to the input bucket to schedule a transcoder job. Navigate to the S3 service in the AWS web console:
- Select your input bucket.
- Click “Upload”.
- Add a WebM audio file.
- Click on “Upload” again.
This action will trigger an s3:ObjectCreated event.
AWS will execute the Lambda function we deployed in the previous step, and it will schedule a transcoder job.
To get more information about a scheduled job, navigate to the Elastic Transcoder service in the AWS web console. Click on “Jobs”, select your pipeline and click “Search”. Here you can select a job to get more details about it.
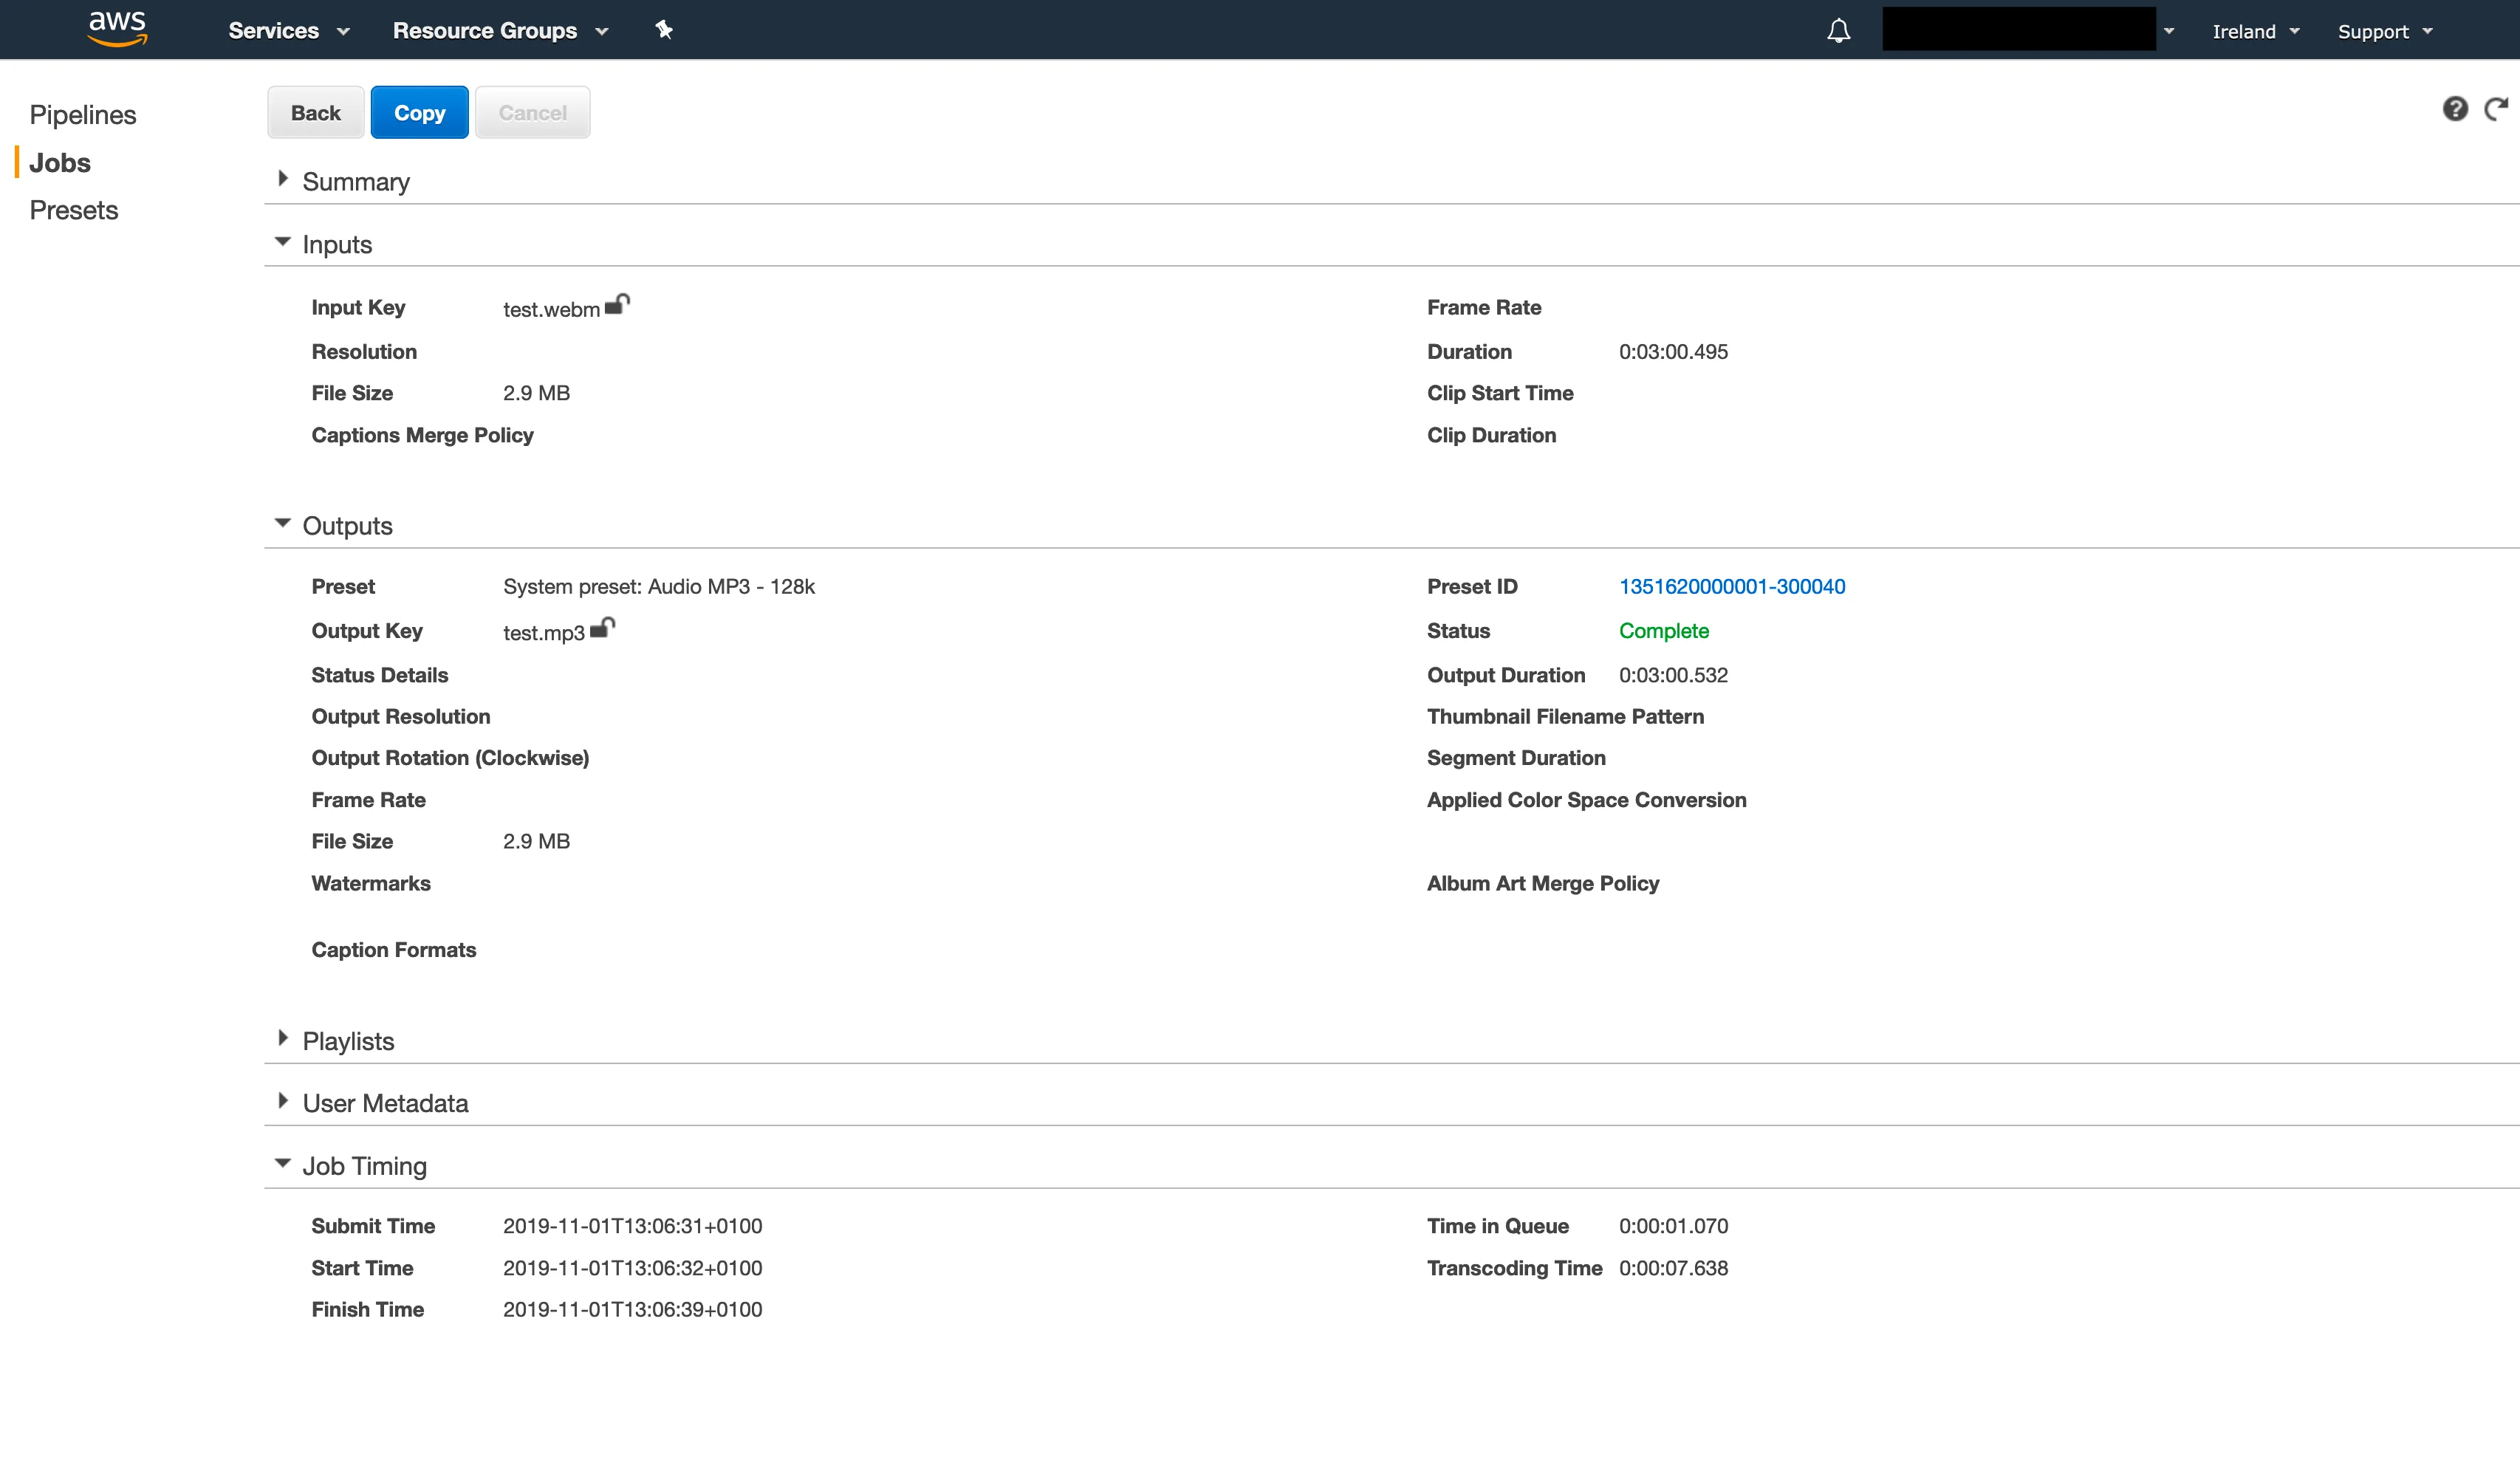
If it has status “Complete”, there should be a file named test.mp3 in the output bucket!
Using FFmpeg and Lambda Layers
FFmpeg is a cross-platform solution that can be used to convert audio and video files. Since it’s a binary, we’ll use a Lambda Layer to execute it from the Lambda function.
What’s a Lambda Layer?
Lambda Layers allow us to “pull in” extra dependencies into Lambda functions. A layer is basically a ZIP archive that contains some code. In order to use a layer we first must create and publish one.
After we publish a layer we can configure any Lambda function to use it4.
AWS will then extract the layer to a special directory called /opt.
The Lambda function runtime will be able to execute it.
How different is this implementation?
We’re basically “swapping out” Amazon Elastic Transcoder with FFmpeg. Other than that the flow is still the same.
So since we’re still converting a WebM audio file to MP3 whenever it’s uploaded to the input bucket, we can reuse the Lambda from the previous implementation by making these changes:
- Replace Amazon Elastic Transcoder with FFmpeg.
- Within the Lambda we will:
- Retrieve the WebM audio file from the input bucket whenever it’s uploaded.
- Convert the retrieved WebM audio file to MP3 using FFmpeg.
- Write the converted MP3 file to the output bucket.
We’ll apply these changes by going through the following steps:
- 1. Create and publish FFmpeg Lambda Layer
- 2. Update the Serverless manifest
- 3. Update the Lambda function
- 4. Release the updated Lambda function
- 5. Upload another WebM audio file
- 6. Optimize the Lambda function
1. Create and publish FFmpeg Lambda Layer
The Serverless Framework makes it very easy to work with layers. To get started create a new project named “lambda-layers”. Move into this directory and create a Serverless manifest in the project root:
service: lambda-layers
provider: name: aws runtime: nodejs10.x
package: exclude: - ./* include: - layers
layers: ffmpeg: path: layers description: FFmpeg binary compatibleRuntimes: - nodejs10.x licenseInfo: GPL v2+, for more info see https://github.com/FFmpeg/FFmpeg/blob/master/LICENSE.mdThe layer is named ffmpeg and the path property dictates that the layer code will reside in a directory named layers.
Match this structure in the project by creating that directory first.
Move into the layers directory and download a static build of FFmpeg from johnvansickle.com/ffmpeg5.
Use the recommended ffmpeg-git-amd64-static.tar.xz master build:
curl -O https://johnvansickle.com/ffmpeg/builds/ffmpeg-git-amd64-static.tar.xzExtract the files from the downloaded archive:
tar -xvf ffmpeg-git-amd64-static.tar.xzRemove the downloaded archive:
rm ffmpeg-git-amd64-static.tar.xzRename the extracted directory to ffmpeg, so it matches the configured layer name in the Serverless manifest. For example:
mv ffmpeg-git-20191029-amd64-static ffmpegYou should now have the following files and folder structure:
lambda-layers ├── layers │ └── ffmpeg │ ├── GPLv3.txt │ ├── ffmpeg │ ├── ffprobe │ ├── manpages │ ├── model │ ├── qt-faststart │ └── readme.txt └── serverless.ymlPublish the layer by running the following command from the project root:
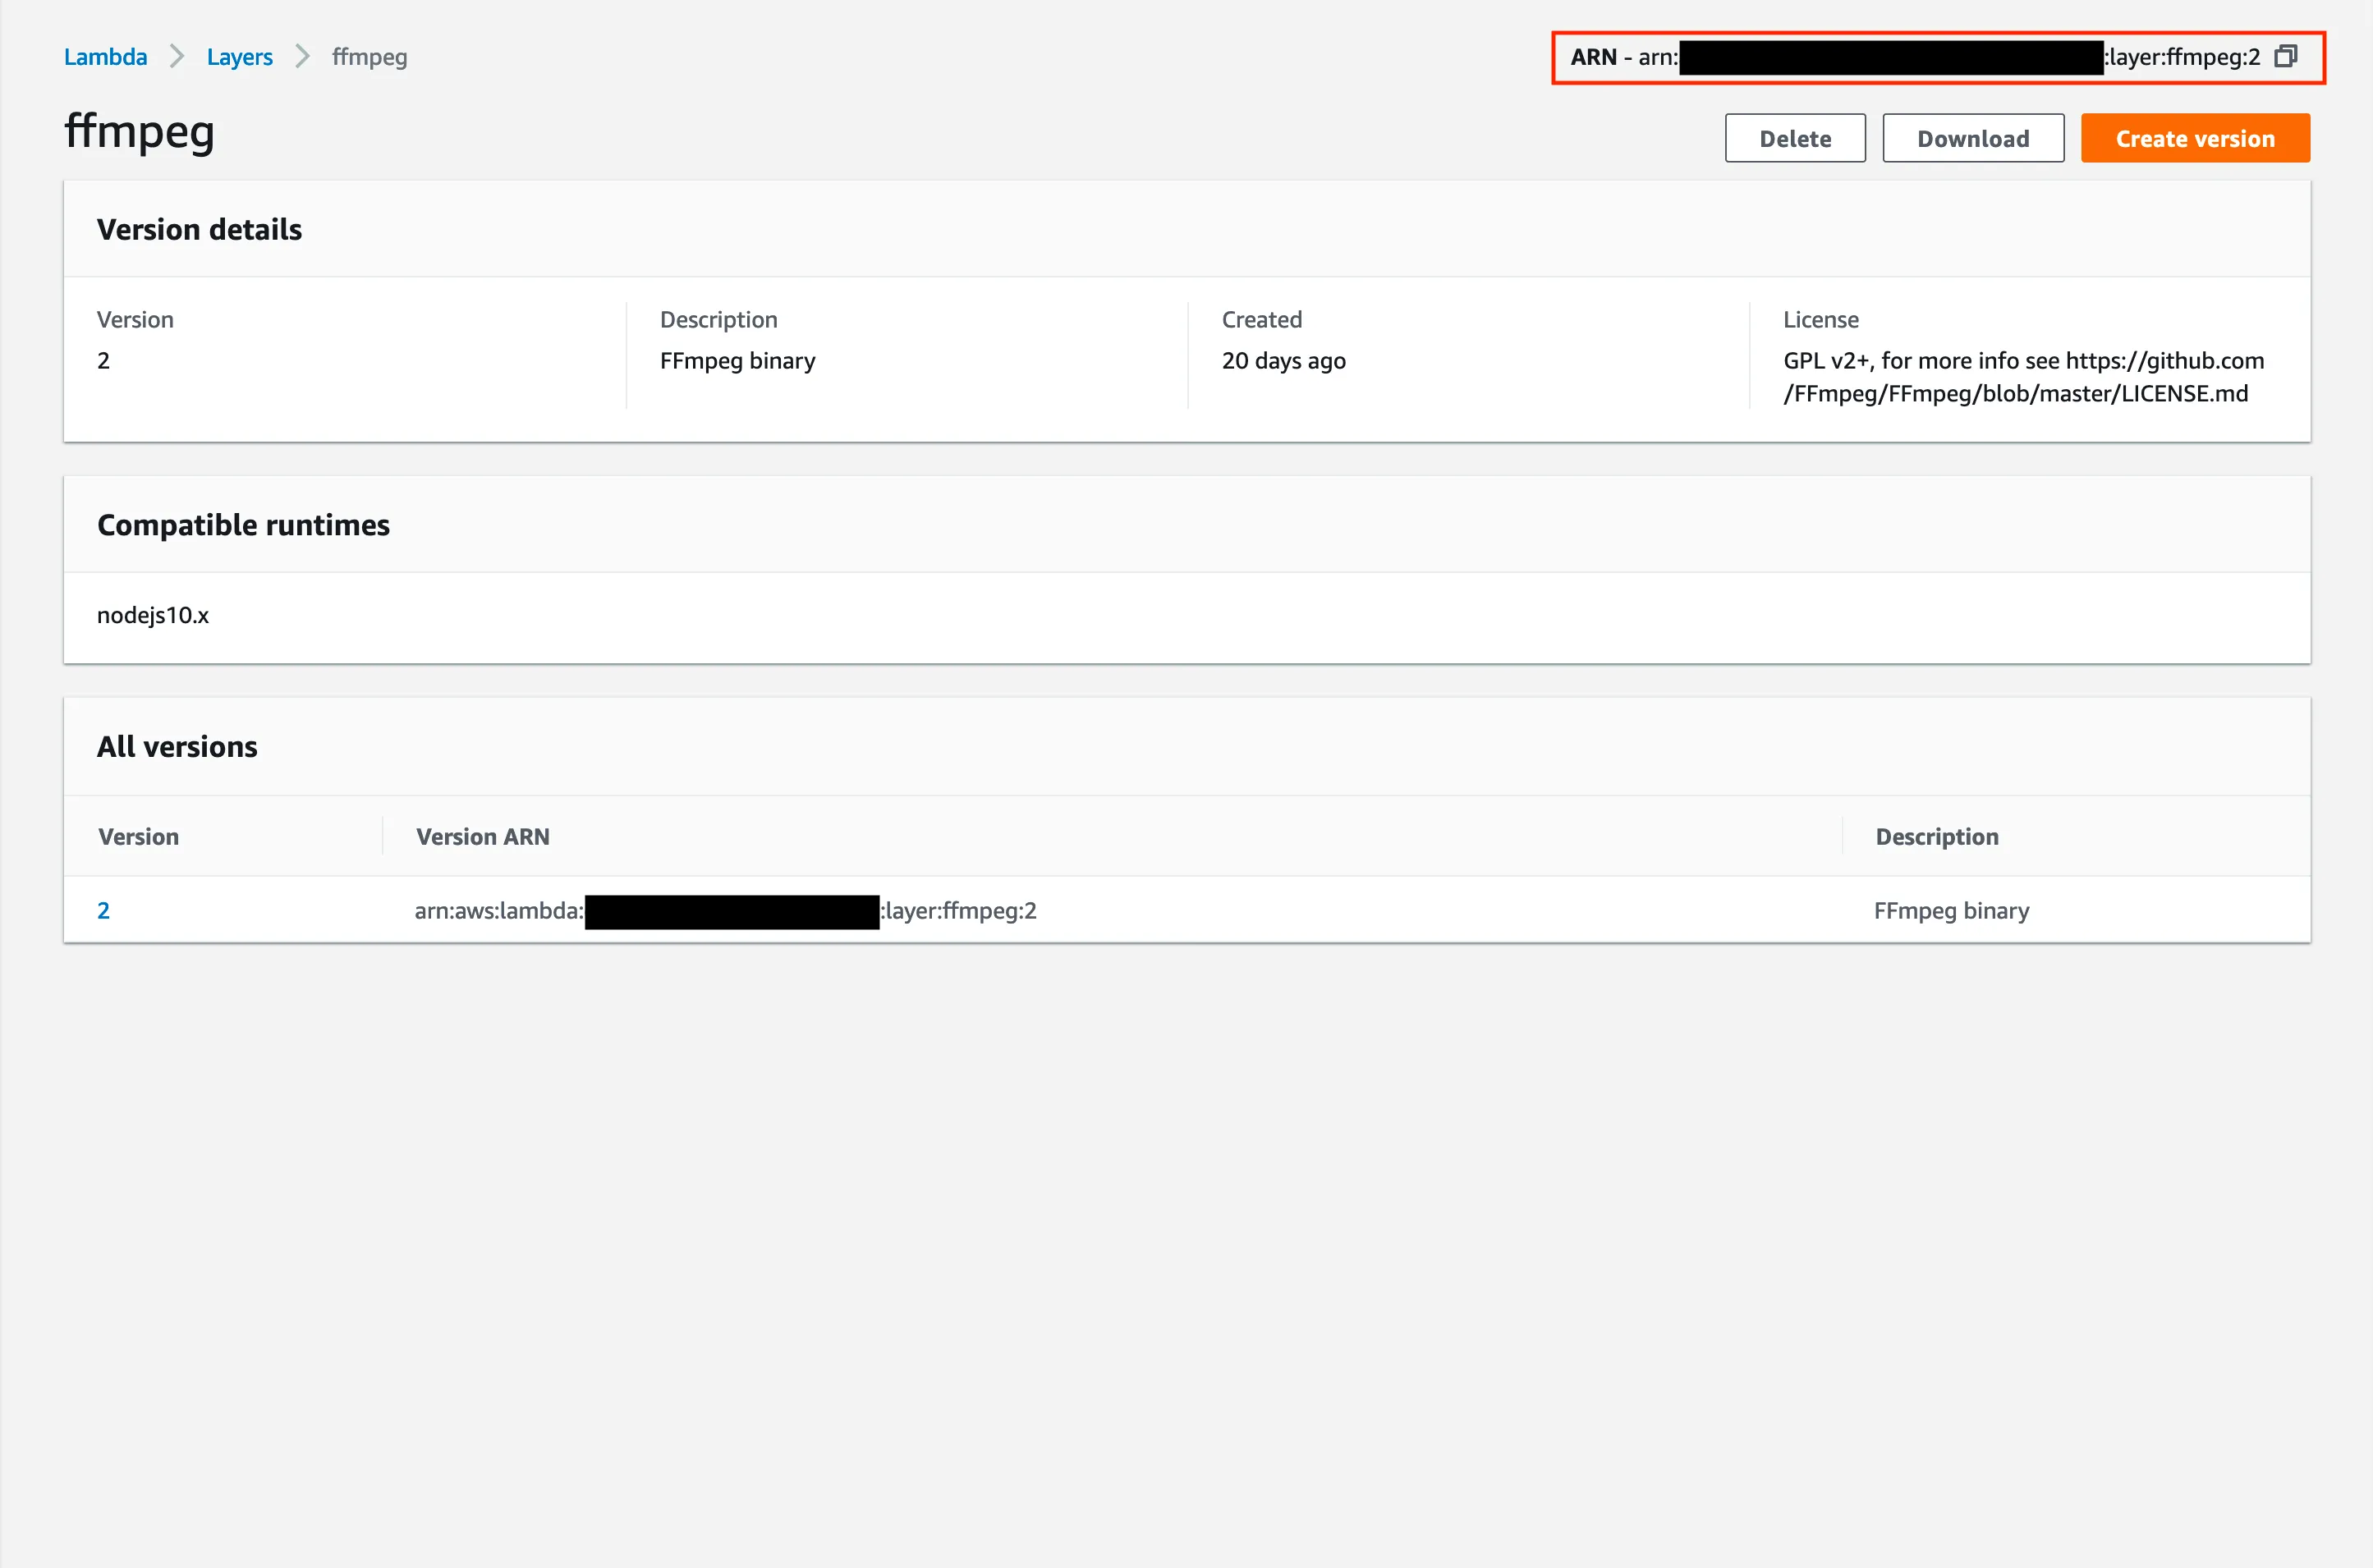
sls deploy --region eu-west-1 --stage prodWhen Serverless finishes deploying, navigate to the Lambda service in the AWS web console and click on “Layers”. Here you should see the published layer. Click on it and take note of the ARN. We’ll need it in the next step.
2. Update the Serverless manifest
We’ll now be modifying the manifest file of the audio-transcoder project.
First change the environment variables, and add the names of your input and output buckets.
Then change the IAM permissions so the Lambda function can read from the input bucket and write to the output bucket.
Finally, change the Lambda function to use the FFmpeg layer with the ARN from the previous step:
service: audio-transcoder
provider: name: aws runtime: nodejs10.x environment: S3_INPUT_BUCKET_NAME: "raw.recordings" S3_OUTPUT_BUCKET_NAME: "transcoded.recordings" iamRoleStatements: - Effect: Allow Action: - s3:GetObject Resource: arn:aws:s3:::raw.recordings/* - Effect: Allow Action: - s3:PutObject Resource: arn:aws:s3:::transcoded.recordings/*
package: exclude: - ./* - ./**/*.test.js include: - node_modules - src
functions: transcodeToMp3: handler: src/handler.transcodeToMp3 description: Transcode an audio file to MP3 events: - s3: bucket: "raw.recordings" event: "s3:ObjectCreated:*" existing: true layers: - YOUR_FFMPEG_LAYER_ARN # Replace this with the ARN from step 13. Update the Lambda function
Since we have to read from the input bucket and write to the output bucket, replace the Elastic Transcoder client with the S3 client.
Use the decodedKey to get the WebM recording from the input bucket:
"use strict"
const S3 = require("aws-sdk/clients/s3")const { S3_INPUT_BUCKET_NAME, S3_OUTPUT_BUCKET_NAME } = process.envconst s3Client = new S3()
module.exports.transcodeToMp3 = async (event) => { try { for (const Record of event.Records) { const { s3 } = Record if (!s3) { continue }
const { object: s3Object = {} } = s3 const { key } = s3Object if (!key) { continue }
const decodedKey = decodeURIComponent(key.replace(/\+/g, " ")) const webmRecording = await s3Client .getObject({ Bucket: S3_INPUT_BUCKET_NAME, Key: decodedKey, }) .promise() } } catch (err) { console.log("Transcoder Error: ", err) throw err }}The S3 client returns an object that contains a Body property.
The value of Body is a blob, which we’ll feed to the FFmpeg layer and convert it to MP3.
We’ll do this via a helper function that will spawn a synchronous child process which allows us to execute the ffmpeg “command” (provided by the FFmpeg layer):
"use strict"
const { spawnSync } = require("child_process")
module.exports = { convertWebmToMp3(webmBlob) { spawnSync( "/opt/ffmpeg/ffmpeg", // "/opt/:LAYER_NAME/:BINARY_NAME" [ // FFmpeg command arguments go here. ], { stdio: "inherit" }, )
// Rest of the implementation goes here. },}For this implementation, we’ll give ffmpeg files to read and write.
We’ll use a “special” directory called /tmp6 for this.
First write the WebM blob to /tmp so FFmpeg can read it.
Then tell it to write the produced MP3 file back to the same directory:
"use strict"
const { spawnSync } = require("child_process")const { writeFileSync } = require("fs")
module.exports = { convertWebmToMp3(webmBlob) { const now = Date.now() const input = `/tmp/${now}.webm` const output = `/tmp/${now}.mp3`
writeFileSync(input, webmBlob)
spawnSync("/opt/ffmpeg/ffmpeg", ["-i", input, output], { stdio: "inherit", })
// TODO: cleanup and return MP3 blob. },}Now check that FFmpeg succeeded, read the produced MP3 file, and return the MP3 blob.
Use a unique temporary directory and clean it in finally, so failures also release the temporary files:
"use strict"
const { spawnSync } = require("child_process")const { mkdtempSync, readFileSync, writeFileSync, existsSync, unlinkSync, rmdirSync } = require("fs")
module.exports = { convertWebmToMp3(webmBlob) { const directory = mkdtempSync("/tmp/transcode-") const input = `${directory}/input.webm` const output = `${directory}/output.mp3` try { writeFileSync(input, webmBlob)
const result = spawnSync("/opt/ffmpeg/ffmpeg", ["-i", input, output], { stdio: "inherit", }) if (result.error) { throw result.error } if (result.status !== 0) { throw new Error(`FFmpeg failed: ${result.signal || result.status}`) }
return readFileSync(output) } finally { for (const file of [input, output]) { if (existsSync(file)) unlinkSync(file) } rmdirSync(directory) } },}Finally, use the MP3 blob in the handler to write it to the output bucket:
"use strict"
const S3 = require("aws-sdk/clients/s3")const ffmpeg = require("./ffmpeg")const { S3_INPUT_BUCKET_NAME, S3_OUTPUT_BUCKET_NAME } = process.envconst s3Client = new S3()
module.exports.transcodeToMp3 = async (event) => { try { for (const Record of event.Records) { const { s3 } = Record if (!s3) { continue }
const { object: s3Object = {} } = s3 const { key } = s3Object if (!key) { continue }
const decodedKey = decodeURIComponent(key.replace(/\+/g, " ")) const webmRecording = await s3Client .getObject({ Bucket: S3_INPUT_BUCKET_NAME, Key: decodedKey, }) .promise()
const mp3Blob = ffmpeg.convertWebmToMp3(webmRecording.Body) await s3Client .putObject({ Bucket: S3_OUTPUT_BUCKET_NAME, Key: decodedKey.replace(/\.webm$/i, ".mp3"), ContentType: "audio/mpeg", Body: mp3Blob, }) .promise() } } catch (err) { console.log("Transcoder Error: ", err) throw err }}Rethrowing errors lets Lambda treat failed work as a failure and apply its asynchronous retry behavior.
S3 events can be delivered more than once, and a retry can repeat records already processed by this handler.
A production version should make repeated processing safe, especially when scheduling a paid transcoding job.
The finally block handles ordinary failures, but cannot run if Lambda terminates the invocation on timeout.
4. Release the updated Lambda function
Run the same command like before from the project root to release the Lambda:
sls deploy --region eu-west-1 --stage prod5. Upload another WebM audio file
When Serverless is done deploying, upload another WebM audio file to the input bucket.
But nothing happens… Where’s the MP3 file?
Let’s find out why this is happening by checking the Lambda function’s log files in the AWS web console:
- Go to the Lambda service.
- Click on the
audio-transcoder-prod-transcodeToMp3function. - Click on the “Monitoring” tab.
- Click the “View logs in CloudWatch” button.
- Select the latest log group.
Here you should see the logs of the Lambda function.
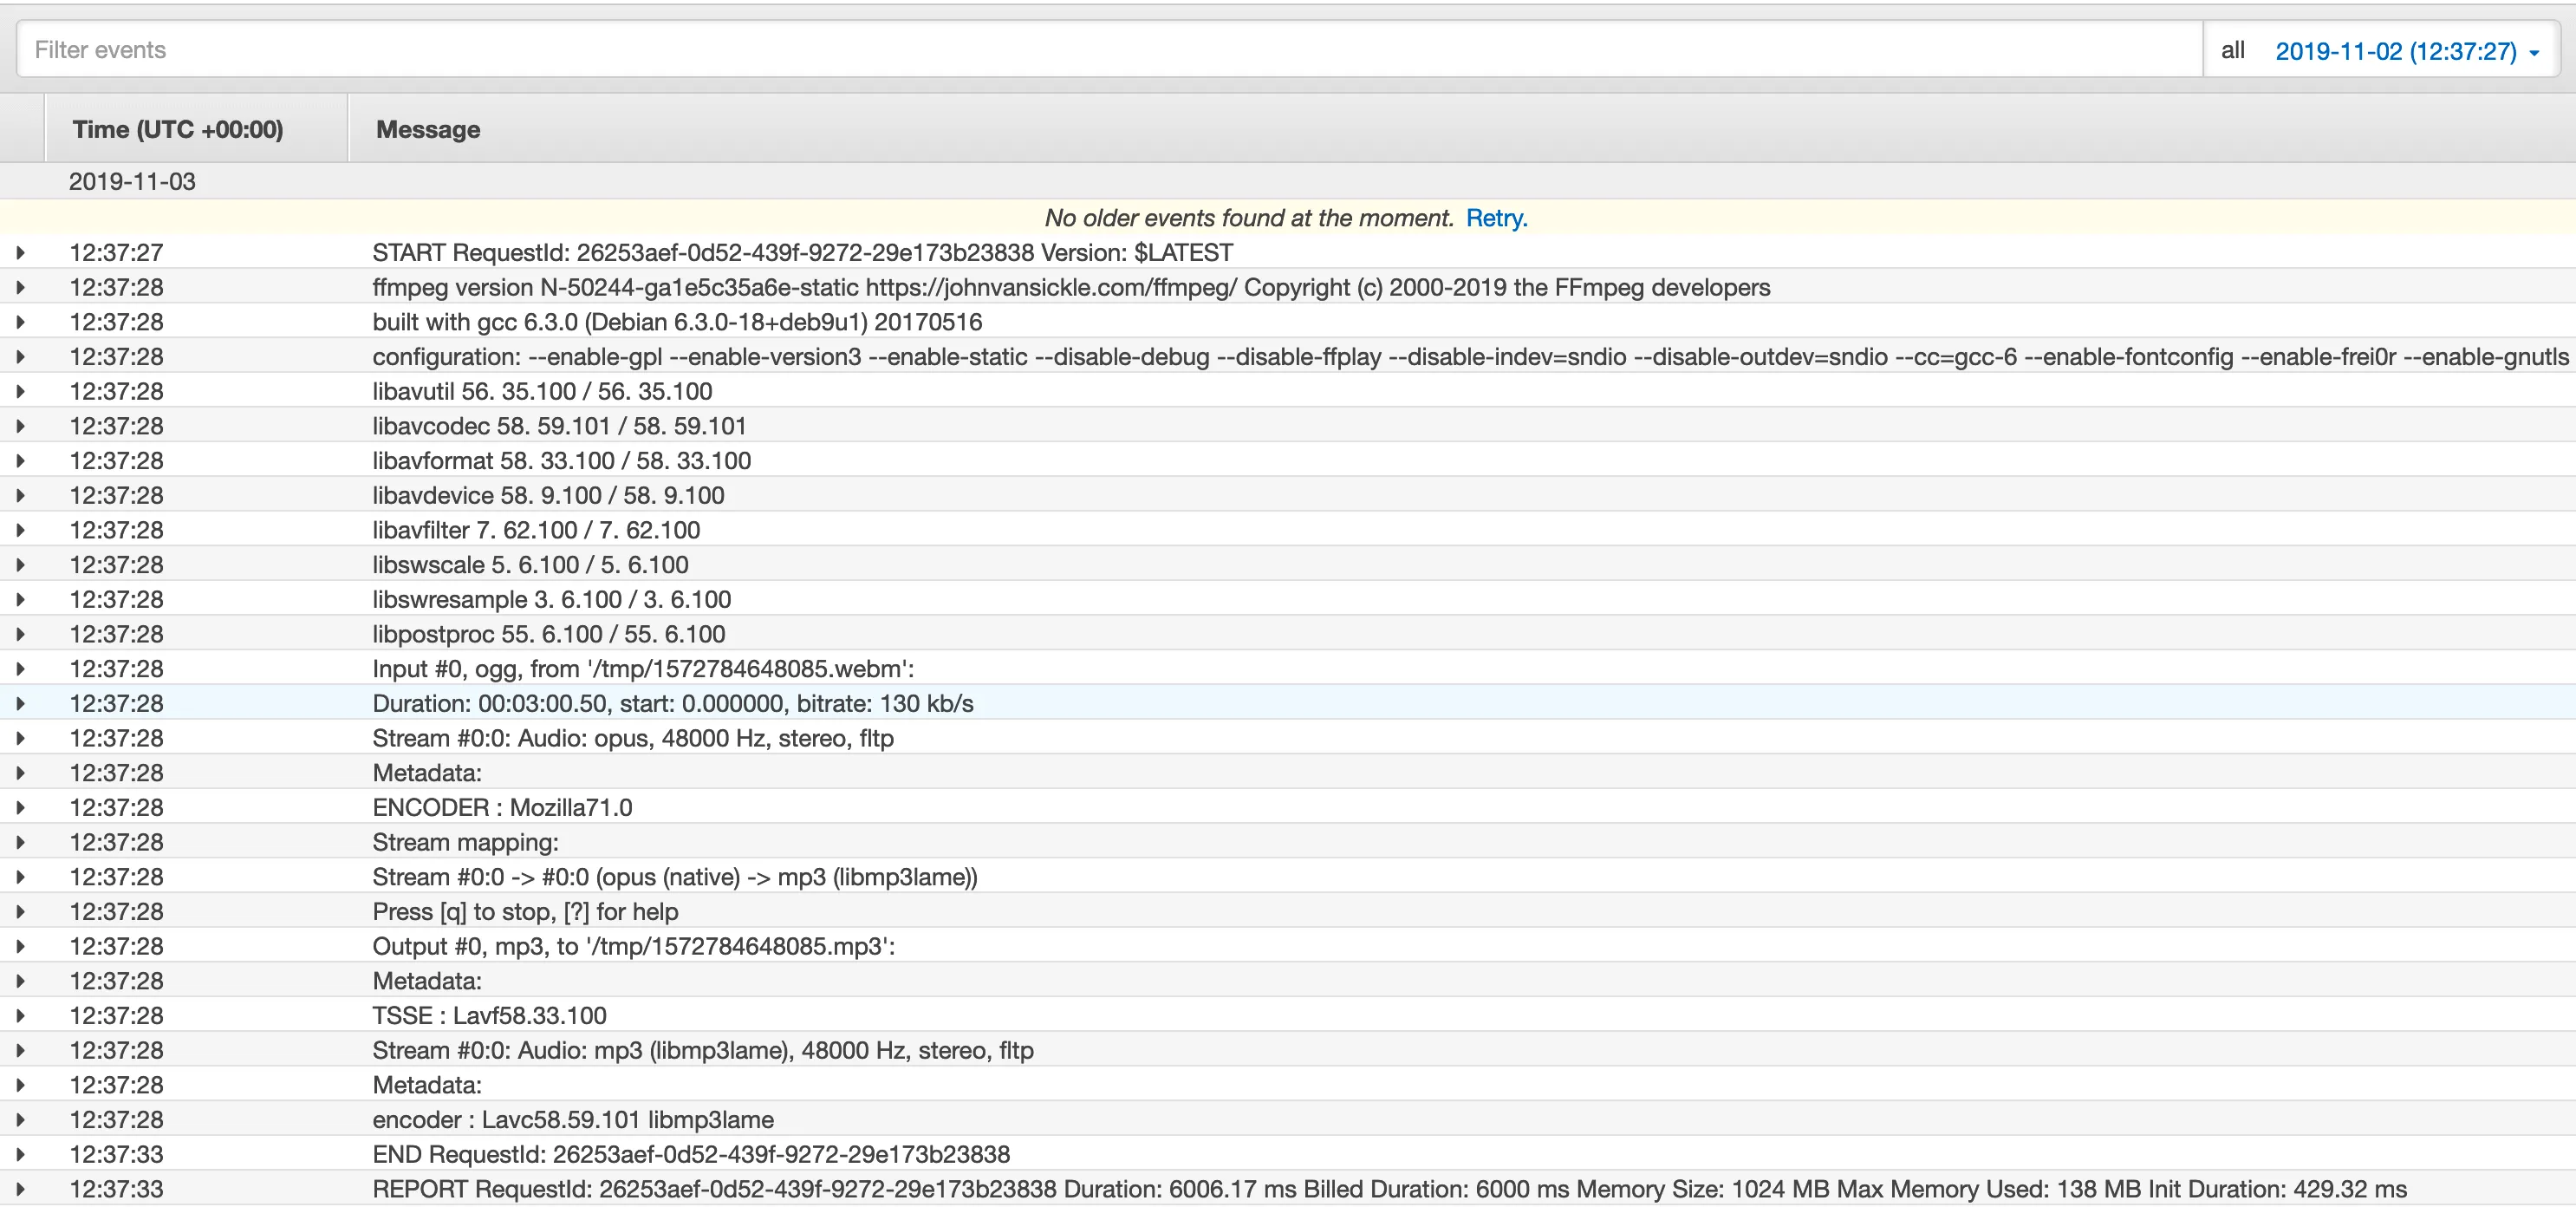
The logs tell us that FFmpeg is executing (hooray!) but that it doesn’t complete (boo!).
In the middle of the transcoding process the logs just say END.
On the last line we see that the Lambda had a duration of 6006.17 ms.
What’s happening? The Lambda function takes “too long” to finish executing. This Serverless setup defaults to a timeout of 6 seconds7: AWS Lambda itself defaults to 3 seconds. After 6 seconds the Lambda function is still not done transcoding, so AWS terminates it.
How do we solve this? By optimizing the Lambda function!
6. Optimize the Lambda function
First let’s just set the timeout to a larger value. For example, 180 seconds. This way we can see how long it would actually take to complete the transcoding process:
functions: transcodeToMp3: timeout: 180Deploy again. When Serverless is done, upload another WebM audio file, and check the logs.
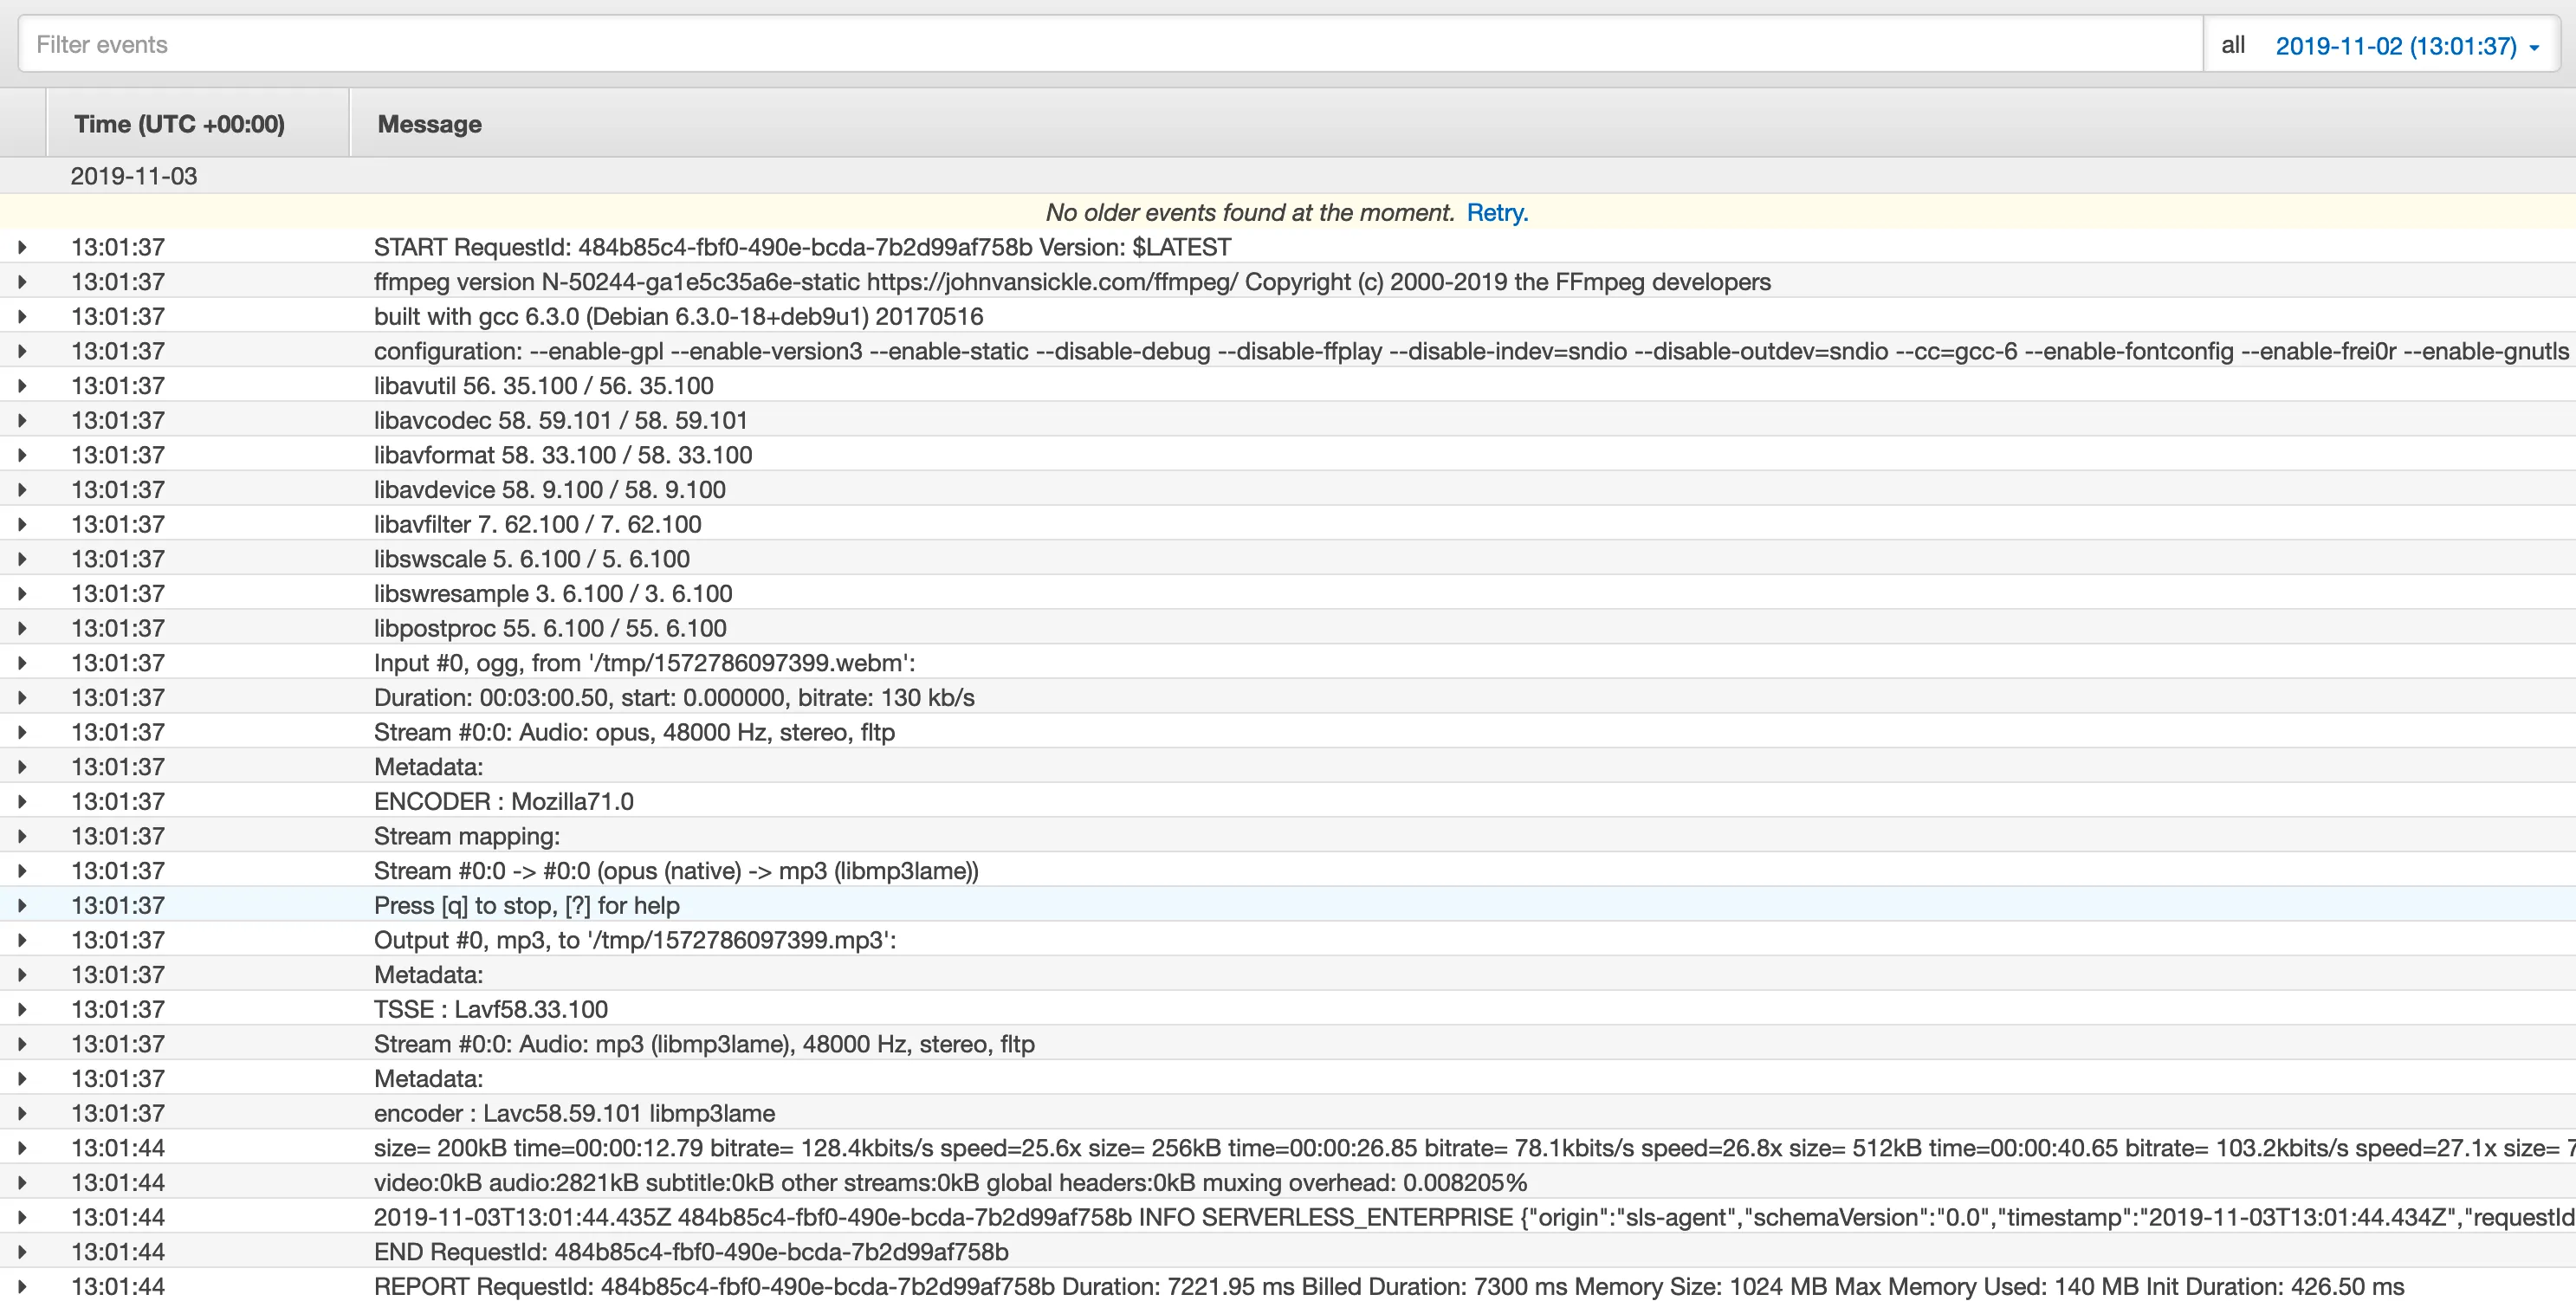
This time we see FFmpeg completes the transcoding process and that the Lambda had a duration of 7221.95 ms.
If we check the output bucket now, we’ll see the MP3 file!
Optimizing further
Transcoding the audio file in ~7 seconds isn’t bad. Actually, it’s very similar to Amazon Elastic Transcoder. But we can do better.
Something that’s very important when working with Lambda, is to always performance tune your functions. Or in other words, always make sure that a Lambda function has the optimum memory size configured.
This is important because when you choose a higher memory setting, AWS will also give you an equivalent resource boost (like CPU). This can reduce the Lambda function’s runtime duration. But cost depends on both allocated memory and billed duration, so faster execution only saves money if it outweighs the higher memory allocation.
By default a Lambda function has a memory setting of 128 MB. So lets increase it and compare results. A good strategy is usually to keep doubling memory and measure the duration. But for the sake of brevity, I’m jumping ahead to 2048 MB:
functions: transcodeToMp3: memorySize: 2048Deploy again. When Serverless is done, upload another WebM audio file and check the logs.
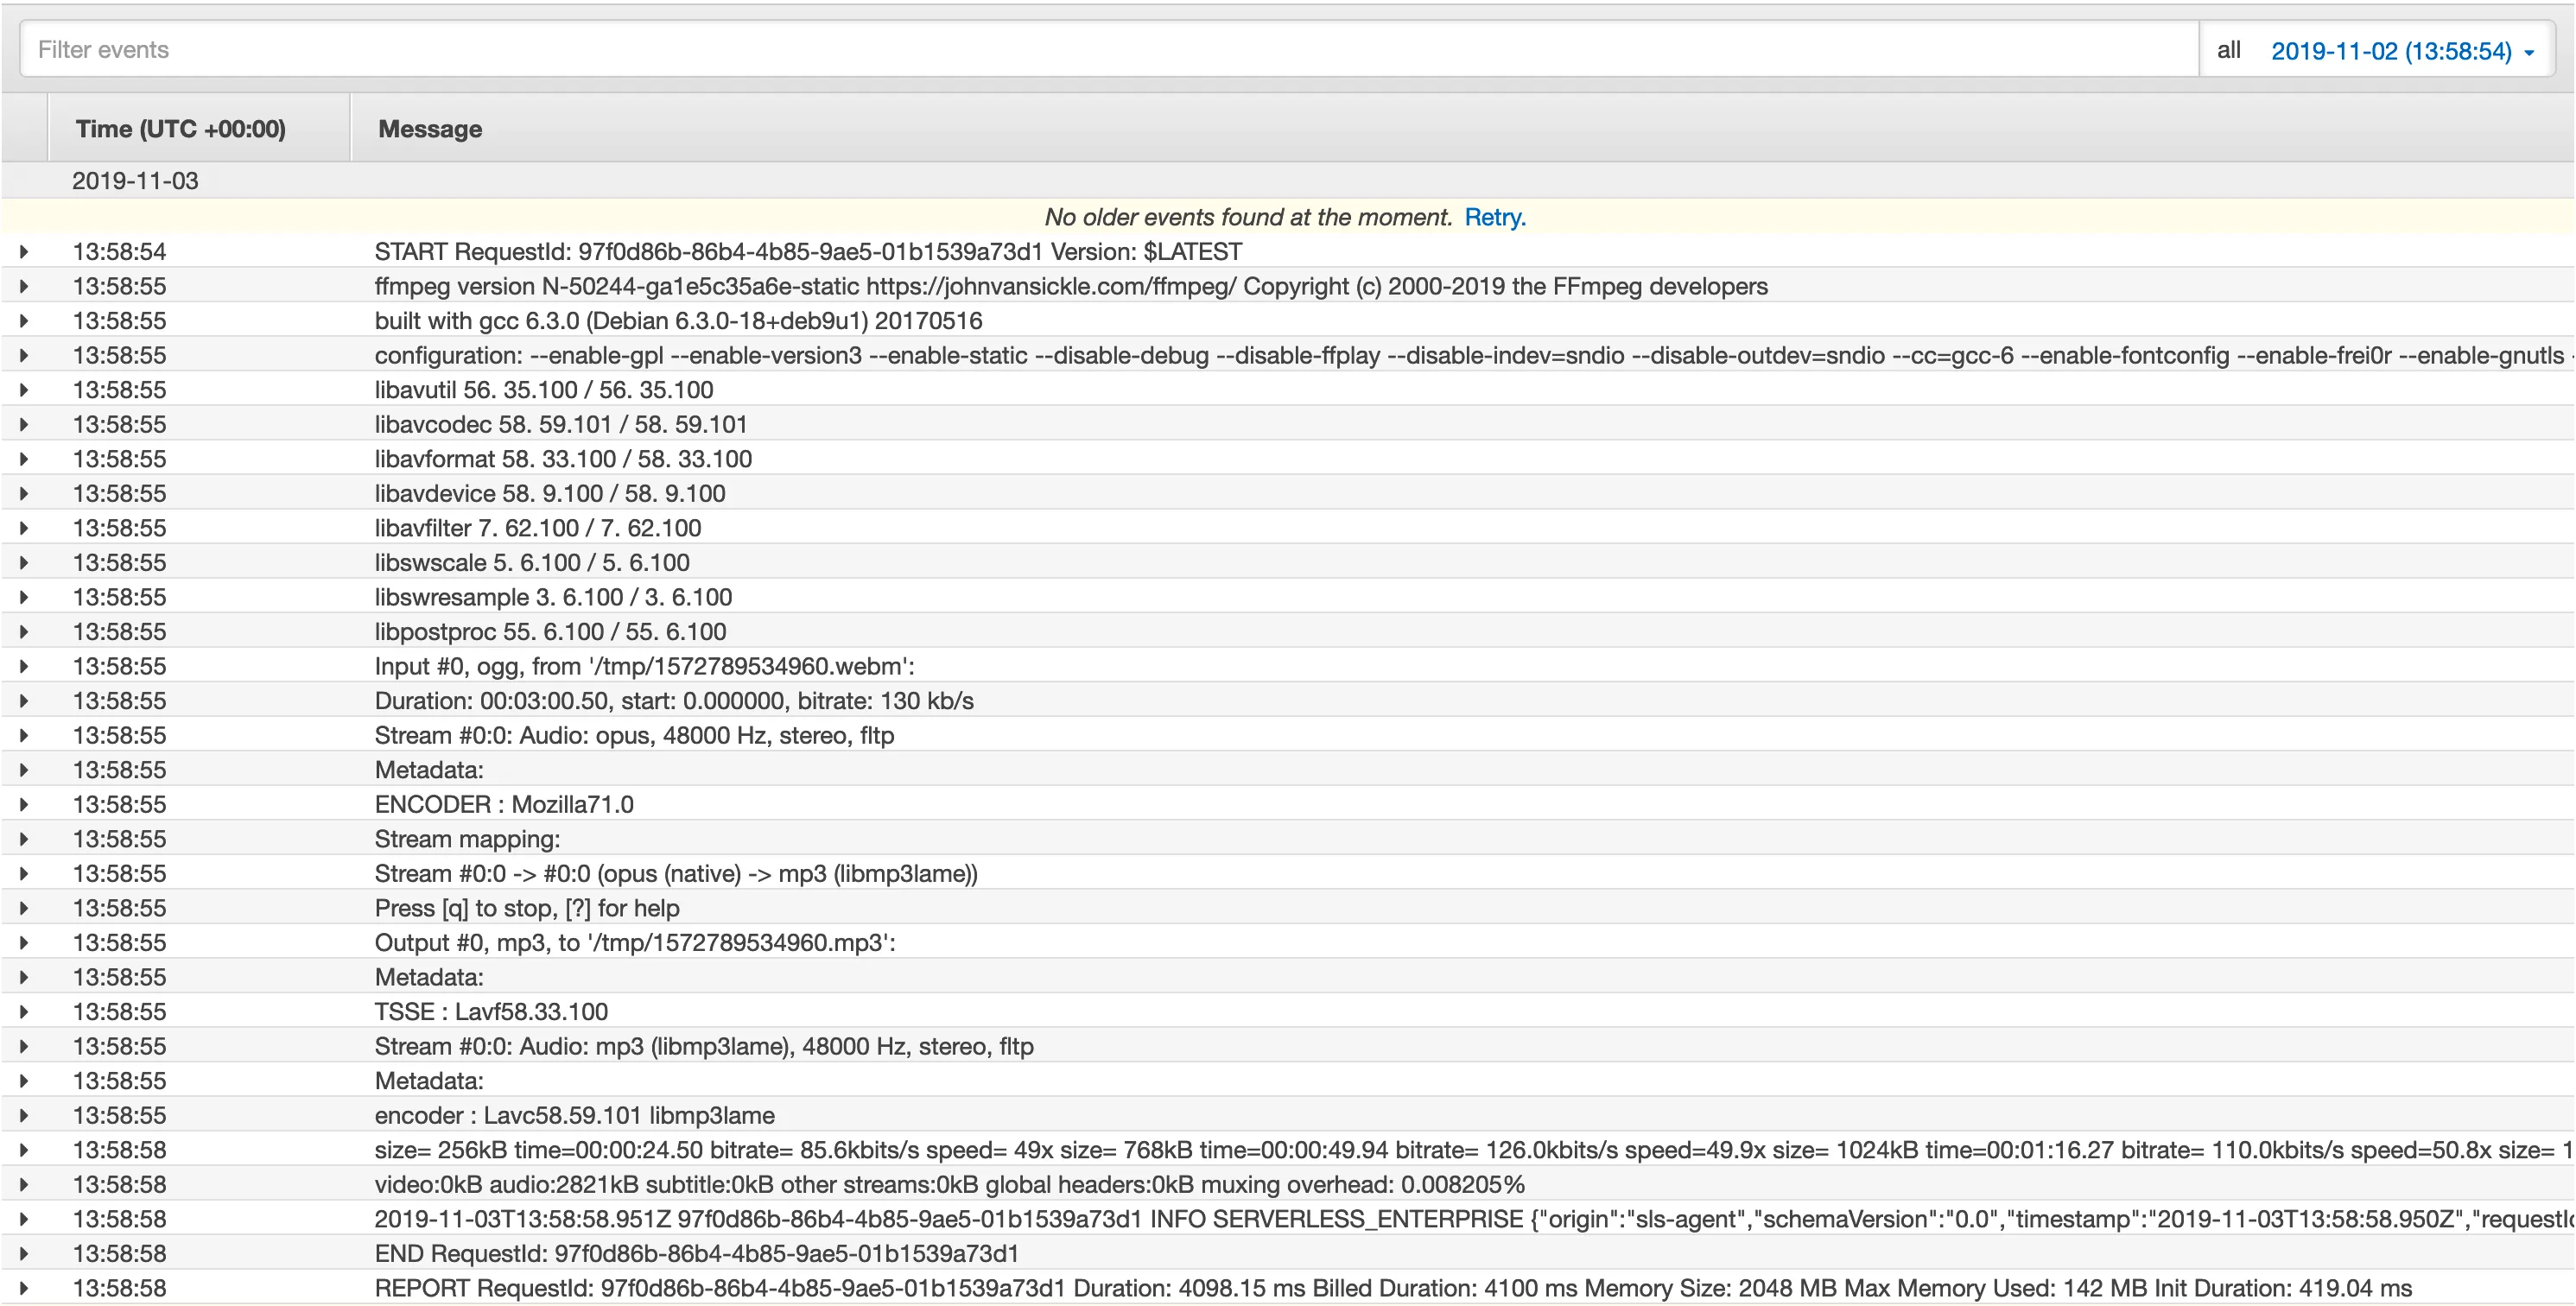
Great, it’s even faster now! Does this mean we can just keep increasing the memory and reap the benefits? Sadly, no. There’s a tipping point where increasing the memory won’t make it run faster.
For example, increasing the memory to 3008 MB (the maximum memory limit at the time of this writing) will result in a similar runtime duration:
Memory 2048 MB
| Test run | Duration | Billed Duration | Cold Start Duration |
|---|---|---|---|
| 1 | 3775,63 ms | 3800 ms | 392,59 ms |
| 2 | 3604,71 ms | 3700 ms | - |
| 3 | 3682,62 ms | 3700 ms | - |
| 4 | 3677,14 ms | 3700 ms | - |
| 5 | 3725,77 ms | 3800 ms | - |
Memory 3008 MB
| Test run | Duration | Billed Duration | Cold Start Duration |
|---|---|---|---|
| 1 | 4125,12 ms | 4200 ms | 407,92 ms |
| 2 | 3767,79 ms | 3800 ms | - |
| 3 | 3736,06 ms | 3800 ms | - |
| 4 | 3662,68 ms | 3700 ms | - |
| 5 | 3717,01 ms | 3800 ms | - |
When done optimizing, make sure to apply a sensible value for the Lambda timeout. In this case, 6 seconds covered these test runs, though production needs headroom for slower inputs and cold starts.
Comparing costs
To compare costs between both implementations, I did a couple of test runs converting a 3-minute (2.8 MB) WebM audio file to MP3.
Warning
The following comparison uses the 2019 rates and measured billed durations (including the 100 ms billing increments used then). It is by no means very extensive, and your mileage may vary. The free-tier calculations assume the monthly allowances are available to this workload. S3 storage and request costs are excluded.
Amazon Elastic Transcoder costs
Elastic Transcoder charged per minute of output audio (rounded up to whole minutes) with 20 free audio minutes per month.
The rate used for these calculations in eu-west-1 was $0,00522 per output minute.
Processing time affects how soon the file is ready, but is not the billing unit.
These are the timing results of the test runs:
| Test run | Transcoding Time |
|---|---|
| 1 | 7638 ms |
| 2 | 6663 ms |
| 3 | 7729 ms |
| 4 | 6595 ms |
| 5 | 8752 ms |
| 6 | 7216 ms |
| 7 | 7167 ms |
| 8 | 6605 ms |
| 9 | 6718 ms |
| 10 | 8700 ms |
So the average transcoding time of the audio file would be:
7638 + 6663 + 7729 + 6595 + 8752 + 7216 + 7167 + 6605 + 6718 + 8700 = 73 783 ms73783 / 10 = 7378,3 ms7378,3 / 1000 = 7,3783 secLet’s say we would be transcoding 100 000 of these audio files per month, with each output exactly 3 minutes long.
That would amount to:
3 * 100 000 = 300 000 output minutesSince we pay $0,00522 per minute, the costs without free tier would be:
300 000 * 0,00522 = $1 566And with free tier it would cost:
(300 000 - 20) * 0,00522 = $1 565,8956What about Lambda costs?
We’re using Lambda to schedule Amazon Elastic Transcoder jobs. So we also have to calculate those (minor if not negligible) costs.
The Lambda pricing page tells us we pay for the number of requests and the duration (which depends on memory setting).
The request rate was $0,20 per million requests, with 1 million requests free each month.
For 100 000 invocations, that’s $0,02 without free tier, or zero with an unused allowance.
We’ll calculate duration costs below and include the request charge in the final totals.
These are the Lambda durations (with 128 MB memory) for the accompanying transcoder test runs:
| Test run | Duration | Billed Duration | Cold Start Duration |
|---|---|---|---|
| 1 | 494,08 ms | 500 ms | 401,61 ms |
| 2 | 185,01 ms | 200 ms | - |
| 3 | 168,29 ms | 200 ms | - |
| 4 | 165,29 ms | 200 ms | - |
| 5 | 184,89 ms | 200 ms | - |
| 6 | 210,19 ms | 300 ms | - |
| 7 | 162,64 ms | 200 ms | - |
| 8 | 178,79 ms | 200 ms | - |
| 9 | 318,84 ms | 400 ms | - |
| 10 | 206,18 ms | 300 ms | - |
The average billed duration would be:
500 + 200 + 200 + 200 + 200 + 300 + 200 + 200 + 400 + 300 = 2700 ms2700 / 10 = 270 ms270 / 1000 = 0,27 secIn eu-west-1 we pay $0,000 016 6667 for every GB-second (GB-s).
That means we first have to calculate “how much” memory the Lambda function uses for its runtime duration.
For 100 000 transcoding jobs per month (with 128 MB memory) that would be:
100 000 * 0,27 = 27000 sec(128 / 1024) * 27000 = 3375 GB-sThe free tier included 400 000 GB-s every month, so depending on your scale you may or may not have to include it in your calculations.
But without free tier it would cost:
3375 * 0,000 016 6667 = $0,056 250 113FFmpeg and Lambda Layers costs
These are the Lambda durations (with 2048 MB memory) of the test runs:
| Test run | Duration | Billed Duration | Cold Start Duration |
|---|---|---|---|
| 1 | 4068,56 ms | 4100 ms | 408,17 ms |
| 2 | 3880,55 ms | 3900 ms | - |
| 3 | 3910,52 ms | 4000 ms | - |
| 4 | 3794,20 ms | 3800 ms | - |
| 5 | 3856,73 ms | 3900 ms | - |
| 6 | 3859,06 ms | 3900 ms | - |
| 7 | 3810,93 ms | 3900 ms | - |
| 8 | 3799,19 ms | 3800 ms | - |
| 9 | 3858,49 ms | 3900 ms | - |
| 10 | 3866,53 ms | 3900 ms | - |
The average billed duration would be:
4100 + 3900 + 4000 + 3800 + 3900 + 3900 + 3900 + 3800 + 3900 + 3900 = 39100 ms39100 / 10 = 3910 ms3910 / 1000 = 3,91 secIn eu-west-1 we pay $0,000 016 6667 for every GB-s.
For 100 000 transcoding jobs (with 2048 MB memory) that would be:
100 000 * 3,91 = 391 000 sec(2048 / 1024) * 391 000 = 782 000 GB-sWithout free tier it would cost:
782 000 * 0,000 016 6667 = $13,033 3594With free tier it would cost:
(782 000 - 400 000) * 0,000 016 6667 = $6,366 6794What about data transfer costs?
Data transferred between S3, Glacier, DynamoDB, SES, SQS, Kinesis, ECR, SNS, or SimpleDB and Lambda functions in the same AWS Region is free.
Otherwise data transferred into and out of Lambda functions will be charged at the EC2 data transfer rates as listed under the “Data transfer” section.
Putting it all together
Costs of transcoding 100 000 3-minute (2.8 MB) WebM audio files to MP3 per month:
| Implementation | Cost without free tier | Cost with free tier |
|---|---|---|
| Amazon Elastic Transcoder | $1 566,08 | $1 565,90 |
| FFmpeg and Lambda Layers | $13,05 | $6,37 |
Footnotes
-
In Safari the Media Recording API is hidden behind a feature flag, but not all events are supported. ↩
-
A container is not always required. WebRTC does not use a container at all. Instead, it streams the encoded audio and video tracks directly from one peer to another using
MediaStreamTrackobjects to represent each track. ↩ -
If you’d like to learn more about audio codecs, I recommend reading the Mozilla web audio codec guide. ↩
-
At the time of this writing a Lambda function can use up to 5 layers at a time. ↩
-
These FFmpeg builds are all compatible with Amazon Linux 2. This is the operating system on which Lambda runs when the
Node.jsruntime is used. ↩ -
At the time of this writing the
/tmpdirectory allows you to temporarily store up to 512 MB. ↩ -
At the time of this writing the maximum timeout is 900 seconds. ↩